
Chapter 1: Getting a domain name for your new eCommerce website
It’s important to understand the basic formula of every single website out there on the Internet:
Domain + Hosting + Website Files = Awesome Website!
The easiest (and cheapest!) part of this formula is getting a domain name for your eCommerce website. A domain is simply your website’s unique ID. No other website can have the same name. It’s also what people will type in their web browsers (e.g Internet Explorer) in order to get to your website.
Domain names are dirt cheap nowadays, ranging from $10-$20 for an entire year. There’s many, many companies out there that offer domain registration services such as GoDaddy, Register.com, Hover, etc. I was a GoDaddy customer for a long time, but over the years GoDaddy seem to have gotten worse and worse about trying to sell you more and more crap you don’t need when you are simply trying to register a new domain. It’s a real shame that what should be a painless process has turned into an endless, confusing journey. This is why I was so pleasantly surprised when I heard about newcomer Hover, and how amazingly quick and easy it was to register a domain name with them. I would highly recommend them.
If you decide to use Hover.com, here is a step-by-step tutorial of how to register your new domain name:
Step 1: Type in www.hover.com in your browser’s address bar.
Step 2: Type in your desired domain name under the heading Domain names made simple, as shown in the screenshot below. Select the type of domain you want(e.g. .com, .org, .net, etc.) from the drop-down menu. Always try to get the .com or .net domain endings if available. Click Search.

*Good domains should be short, easy to remember and easy to spell. Always try to get the .com or .net domain endings if available.
Step 3: If your desired domain is available, you will see a screenshot like the one below. Otherwise try searching for another domain in the search box. By default, Hover will give you the price for the domain plus 6 mailboxes. We will change this since we are going to be buying a separate hosting plan. Click the drop-down box next to your desired domain name under the Add Mailboxes column. Change this to NONE.

Step 4: Click the small + sign to add the domain to your checkout cart.
Step 5: On the right sidebar, you will see your shopping cart has been updated with total. Click the CHECKOUT button.
Step 6: You will now see the Shopping Cart screen and the total amount for your domain. As of this writing, domains are $15 per year at Hover. However, if you type in the code JLudena in the promotional code box highlighted below, you can get a 10% discount AND my eternal gratitude! What a deal! Click CHECKOUT when you are ready.

Step 7: If this is your first time registering a domain using Hover, you will be asked to create an account. Fill out the few fields on the right and click CREATE ACCOUNT.
Step 8: The next step is pretty self-explanatory and I don’t think we need to go too much into detail here. One important thing to notice is that checkbox at the bottom of the Registry Information. The information you enter here can be viewed by anyone who wants to know more about who owns a particular domain. This is a requirement for any new domain under the rules of the web. If you’d rather not have people know any of your personal information, make sure you check the box shown below and Hover will mask your contact information by using their own. Click CONTINUE.

*Make sure to check this box so Hover won’t display your contact information when someone does a WHOIS search on your website.
Step 9: Fill out your Billing Information on the next screen. Click CONTINUE and confirm your order. Click FINISH if everything is correct.
Congratulations! You just registered a brand new domain name! Now wasn’t that easy? Now, we’ll go back to Hover later on in this tutorial to change some settings, but we are done for now. In the next chapter, we will look at the second major part of the website equation: the hosting plan.
Chapter 2: Getting a hosting plan for your eCommerce website
So what exactly does hosting mean? Think of it in terms of paying rent. You are basically paying rent to a company in order for them to store all of your website files on their servers. For this service, you will pay them a fee every month. Even though a hosting plan is probably the most expensive part of our E Commerce store, we are still only talking about $5-$10 a month for a good hosting plan for somebody who is just getting started with their online store.
Now, just like domain registrar companies, there are so many hosting companies out there that can make the selection process a little daunting. Names like BlueHost, HostMonster, HostGator, Yahoo etc. are all good choices. However, one of the most trusted and respected names in small-business hosting is BlueHost. I have used their services since 2008 and I never had any problems whatsoever. Their servers are rock-solid and their customer support is awesome. I remember calling them one time at 2am to fix an issue with one of my client’s websites, and they were incredibly friendly and helpful. You really can’t go wrong with these guys.
If you do decide to select BlueHost as your hosting provider, here is a step-by-step tutorial to setup your new hosting account.
Step 1: Click here to go to the BlueHost sign up page.
Step 2: Click the big green Sign Up Now button on the homepage.

Step 3: Since we already own a domain we want to use, type in your domain name inside the I Have a Domain Name box. Click the Next button.

Step 4: You will now see the Sign Up page which is pretty self explanatory. After filling in your account information, take a look at Package Information before you proceed any further. The 24-month will be selected by default since it gives you the cheapest price per month. I would recommend you change this to just one year since this is the same timeframe we have for our newly registered domain. In addition, uncheck both the SiteLock Domain Security and Site Backup Pro options since we don’t want to pay for unnecessary features at this point. Finally, fill in your payment information and click Next.

Step 5: BlueHost will show you a Welcome screen saying that your account creation was successful. It will also ask you to select a secure password for your new account so click the Create a Password link.

Step 6: Select a password that contains the password requirements listed on the right side in red letters. Leave the verification pin empty. Click Submit.
Step 7: BlueHost will notify you that your password has been updated. You can now login in to your BlueHost account by typing in your domain name (in our example it would be myfirstonlinebusiness.net) and the password you just created. If you logged in succesfully, you will see your hosting account’s control panel or cpanel as it is also known.
Congratulations! You are now the proud owner of a hosting account. The second piece of the website puzzle is now done! You are that much closer to having your very own e commerce store. In the next chapter, we will look at how to get our domain and hosting account to play nice with each other.
Chapter 3: Linking your Domain and Hosting accounts
Our next step is to point our domain to our new hosting account. If you signed up with Hover and BlueHost, here are the step by step instructions on how to do this.
Step 1: Go back to Hover.com. If necessary, login back to your Account by clicking the Sign In link on the top right corner of the homepage. Type in your Username and Password and click the Sign-In button.

If you are still logged in from your last session, click the Account link.

Step 2: You will now see a screen with all your services or Your Stuff listed. Select the new domain you want to link to your hosting account by clicking on it as shown below.

Step 3: Click the Manage Domain tab as shown in the screenshot below.

Step 4: You will be presented wit 3 options: Registry Records, Name Servers and Manage DNS. Click the Name Servers option.
Step 5: You will see a menu open up where you can change the Name Servers. If you are using BlueHost as your hosting company, your settings should be:
Name Server 1: ns1.bluehost.com
Name Server 2: ns2.bluehost.com

Click Save when you have completed this step. Hover will let you know that your name servers have been updated.
Step 6: Go back to bluehost.com. If you need to login again, click the Control Panel Login button on the top right corner as shown below. Type in your domain name and password if necessary.

Step 7: Click the Domain Manager tab in the main control panel screen as highlighted in the screenshot below. 
Step 8: Under the Shortcuts heading, click the Assign a domain to your cPanel account link.

Step 9: By default, the Use a domain that is not already associated with your account option is highlighted in the Enter Domain section. Enter your domain name without the www. in the box as shown below.

Step 10: If you correctly pointed your domain to your hosting account, you will see the message Ownership verified under Verify Ownership.
Step 11: In the Choose Addon vs. Parked section, make sure that Addon Domain is selected (it should be by default).
Step 12: Under Choose Addon Directory and Sub-domain, the Create a new directory option should be selected by default. You will see that BlueHost will create a directory with your domain name in your hosting account to keep things organized. This is perfect so you don’t have to make any changes. BlueHost also gives you the option to type in a Sub-domain in case you already have a previous domain linked to your hosting account. This is completely useless so you don’t really have to worry too much about it. Click the Add Domain button. 
Step 13: As you can see in the following screenshot, BlueHost will now tell you that your new domain has been assigned to your hosting account. If this is your first domain, the Type will be Primary. If you have multiple domains registered in your hosting account (like I do), it will say Addon.

Guess what? That’s pretty much it! Your domain and your hosting account are now ready to go. You can repeat this process to link as many domains as you like (and your hosting account can handle).
In the next chapter, we will look at creating the actual website using the most popular Content Management System on the web: WordPress.
Chapter 4: Installing WordPress
So what exactly is WordPress? WordPress is a Content Management System, or CMS for short. A CMS makes creating & editing your website’s content a breeze, without having to know any kind of code or programming skills. There are many CMS out there such as Joomla, Drupal, ExpressionEngine, WordPress, etc. Some are free, some are not. WordPress is completely free and one of the most popular and widely used CMS in the entire world wide web.
There is very good reason for this. WordPress has a user-friendly interface, tons of free add-ons that can add functionality to your website (we will look at one later on in this tutorial) and thousands of free themes (templates or “skins” that can change the entire look of your website!). Yes. WordPress is definitely king when it comes to creating a professional looking website in no time and for very little, if any, money.
Usually, installing a CMS on a server can become somewhat complicated if you are not very tech-savvy. Fortunately for us, WordPress has become so immensely popular that many hosting companies, including BlueHost, now offer a super simple one-click installation within your control panel.
Let’s take a look at how you would install WordPress using BlueHost’s control panel.
Step 1: Go back to your main cPanel screen by clicking the cPanel tab on the top left corner or log back into BlueHost if necessary.
Step 2: Click the Word Press icon under the Software/Services section.

Step 3: BlueHost will tell you a little about WordPress and give you two options: Install or Import. We will create a brand new installation of WordPress so click Install.

Step 4: As you can see in the next screen, BlueHost will give you an option to install different versions of WordPress. Use the default option since it will be the latest version. You will also be able to select under which of your domains you want WordPress to be installed. If you only have one domain linked to your BlueHost account, this domain should be selected by default. Mark the checkbox under Legal Information and click the Complete button.

Step 5: WordPress will begin the install. After the installation is complete, BlueHost will give you your new WordPress credentials. Please print this page or write it down so you won’t forget it. As you can see, you will now have a special Login Url link for administrator’s so you can login to WordPress and make changes to your site. Click the Login URL link.

Chapter 5: Your new eCommerce store behind closed doors
You are now looking at the entrance to your website. Type in your Username and Password given to you in the previous step and click the Log In button to enter you new WordPress-powered eCommerce store backend.

Voila! You are now looking at the back-end of your website. Please know that this is not what your visitors will see. This is only for you, the website administrator. Within WordPress, you will be able to create pages, add/edit images, insert video/audio, etc. Yes. All of that and more! I hope you now understand the real power of a CMS.

Step 7: Want to see what your website actually looks like on the outside though? Just click the name of your website on the top left corner, next to the WordPress icon as shown in the screenshot below.

There you have it. The highlighted area will be what your visitors will see in their browsers. This is what every default installation of WordPress looks like. Not too bad, but keep on reading and see how easily we’ll be able to change the entire look & feel of our e commerce website by simply downloading and installing a theme! This is one of the areas where WordPress really shines. Because the platform is so immensely popular, there are literally thousands of free and premium products that can completely transform your regular blog/website into a powerful and dynamic web application. All without knowing a lick of code.

Chapter 6: Adding the power of eCommerce with one click: Jigoshop
It’s finally time to do it. We will now add the powerful functionality that will transform our regular ol’ WordPress website into an eCommerce powerhouse where people will be able to browse, buy, and pay for our products online with absurd ease.
Again, I have done all the research for you, trying several different e commerce solutions for WordPress and decided on Jigoshop at the end. I’ll tell you why:
- It’s free
- It looks great out of the box
- It’s incredibly user-friendly
- It just works
Now, I have to admit that there are other e commerce plugins that deserve a mention such as wp e-commerce, eshop, ecwid, etc. However, I wanted your experience to be smooth and as easy as possible and some of these other plugins are either too complicated, look pretty plain, or simply make managing an e commerce website more trouble than it should be by having to manage a separate website just to look at your products . I’m looking at your ecwid.
I am not writing this tutorial for the geeks like myself out there. I know they can handle themselves and will try the most complicated solution first simply so they can fiddle with everything under the hood. I understand that because that’s the same way I am. However, for my non-geeks out there, I decided to pick Jigoshop because it offered that perfect balance for the beginner that I know I would appreciate if I was just getting started in the e commerce business.
Enough talking, let’s get going, shall we?
Step 8: Hit the back button on your browser to go back to WordPress’ admin back-end.
Before we start messing around, I want you to take a look at the back-end of WordPress really quick. As you can tell, the sidebar on the left side is how you can access all the different sections inside your WordPress website. By hovering your mouse over one and clicking the down arrow, WordPress will show you the submenus under each menu.
Step 9: Let’s click the Plugins menu button in order to access the plugins section of our e commerce website.

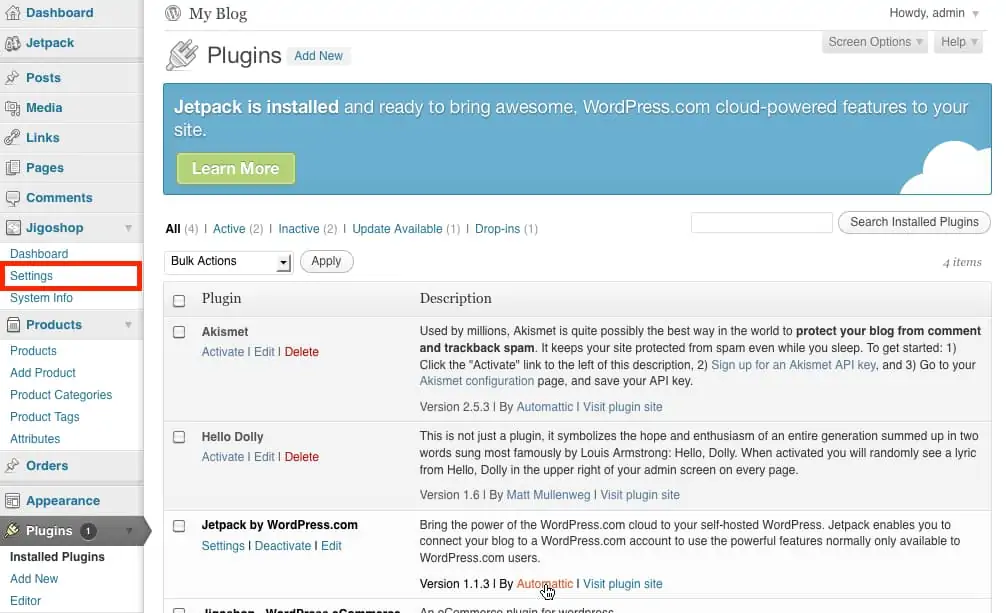
Step 10: As you can see, in this page you can take a look at which plugins you have installed for WordPress. By default, WordPress comes with a couple of Plugins as you can tell from the list. If you are seeing the big blue Jetpack banner for example, it means that you have that plugin installed and activated. Don’t worry too much about these at this point. We want to add a new plugin though, so click the Add New button right next to the Plugins title at the top of the page.

Step 11: You should now be in the Install Plugins page. Here, you will search for the Jigoshop plugin by typing in Jigoshop in the Search box as show below.

Step 12: If everything went according to plan, WordPress should’ve found the Jigoshop plugin and will list it in the Install Plugins page with a star rating and short description of what the plugin does. Click the Install Now. You may get a pop message asking you if you are sure you want to install the plugin. Click OK.

Step 13: You should now see the Installing Plugin page. The installation process is almost instantaneous and shouldn’t take more than a few seconds. Click Activate Plugin when everything is ready.

Step 14: The next screen will confirm that everything went smoothly by showing you a yellow box saying that the plugin has been activated. Now, if you have been paying attention to what you have been doing and not just following my steps like a mindless drone (I hope you haven’t!), you will realize that WordPress has three new menu buttons on the left sidebar. Those are Jigoshop, Products, and Orders. Yes. Those are there so we can manage our new e commerce store!

Better get ready for our next chapter because we will finally be adding products to our brand new store and setting up a payment gateway for our customers. Go get some coffee and come right back! This is where your e commerce store really comes to life.
Chapter 7: Setting up Jigoshop beforehand
Step 1: Before we start adding products we’ll quickly change a few settings inside Jigoshop in order to fit to our needs. Click “Settings” under the Jigoshop menu as shown in the screenshot below.
Step 2: You will be presented by default with the “General” tab of options for the your Jigoshop store. Since I will be doing business only in the US for convenience, I’ll go ahead and change the “Base Country/Region,” “Currency,” and after selecting “Specific Countries”, type in United States in the box underneath. You will obviously need to select what fits your store needs. Make sure to save your settings by clicking the button on the bottom right labeled “Save Shop Changes.”

Step 3: We’ll now switch to the “General” tab. Here we’ll set the email address we want to use to receive notifications when somebody places an order. Also, I’d recommend check the “Redirect to Cart” button for a smoother ecommerce experience for your user. This will take them to their shopping cart where they can review their order, and then finally proceed to checkout. Save your settings again before proceeding.

Step 4: Switch to the “Images” tab this time. Here, we’ll set our desired image sizes for our thumbnails, featured images, etc. Below are my recommended settings for “Cropping Options.” Since WordPress’ default theme tends to distort our thumbnails, it’s better to check the following options: “Crop Thumbnail images,” “Crop Catalog images,” “Crop Large Images.” This way we’ll be able to have a good looking cropped image instead of a distorted one.

Step 5: As you can see from my settings below, I wanted a good size “Catalog Image” (listed alongside your other products when somebody clicks your Store page), and the bigger “Large Image” for the single product page. Don’t worry too much about these since some of the default theme will end up overriding these so they won’t be exact. Just keep in mind that “Thumbnail Images” are the smaller, additional images in your product page. You’ll see exactly what this is all about in one of the next chapters.

Now, let’s switch over to the “Products and Inventory” tab. Here, I’ll change the Weight and Dimensions units to fit my U.S. based customers. You can also change how many products to display per row inside your “Shop” page. The default settings are fine with me so we’ll move on.
Let’s move to the “Tax” tab for a moment. I don’t plan on explaining much about this since I am by no means an expert in taxes. The thing that I do know, at least for U.S. based businesses, is that if you own an actual, physical store, you must pay taxes based on your state laws. However, if you are only starting out (which you probably are), and don’t have a store and are just selling your items through your online store, you do NOT need to charge for sales tax. This is based on information from the Small Business Administration. You can read more information about it here. Since I am just a boot-selling kid with a dream and I am operating from my apartment, I will go ahead and uncheck all the options in the “Tax” tab since they don’t apply to my business.

Onto less sensitive matters that won’t likely get us audited, click on the “Shipping” tab next. Unfortunately, the basic version of Jigoshop doesn’t come with integrated shipping carriers like UPS, USPS, or FedEx already built in. These are all add-on plugins that can extend the functionality of Jigoshop. For now though, we are trying to keep our costs as low as possible so that’s why we’ll just stick to the free version. All you have to do is do a little homework and either call your carrier of choice (UPS, USPS, FedEx), or go to their website and find out how much they would charge you to ship on average within your country. They usually have all that information online or handy calculators to figure it out. For my American entrepreneurs, I personally like USPS since their flat rates are the same for shipping anywhere within the United States and you get free boxes! All you gotta do is go to the USPS.com and order all the boxes you will ever need. I have enough in my garage to build a small castle. If you are ever in the Houston area, please come by and pick some up. I’m starting to feel guilty!
Enough chit-chat! Now that you have a good ballpark figure, we’ll specify the “Flat Rate” cost in Jigoshop’s “Shipping” tab as you can see below.


I’ve also went ahead and changed a few other things as further incentives for my customers. For example, if their order is $150.00 or more, they’ll qualify for FREE SHIPPING. People looooove FREE SHIPPING. Also, make sure you include your specific countries as I have.
Oh wow. We are done with all our settings….almost! Next chapter will be perhaps one of the most critical, and often confusing parts of the eCommerce equation for most beginners: Setting up a payment system. Take a quick breather and come back in 5.
Chapter 8: Setting up a payment gateway for your eCommerce store
Yes indeed. It’s that time. The time to talk about exactly how we are gonna get paid! It wouldn’t be eCommerce without a way for customers to pay you for your goods or services right? Of course not. So let’s get to it.
For some unknown reason… implementing a payment gateway is sometimes quite scary for somebody starting out. There’s so many terms and definitions nowadays that it’s hard NOT to get confused. PayPal is probably one of the biggest culprits here. Their free service (which I will show you how to implement in a bit) works perfectly, but they have SO MANY FREAKIN’ services it’s unbelievable. PayPal Standard, PayPal Payments Advanced, PayPal Payments Pro (which as a matter of fact used to be called PayPal Website Payments Pro until recently!), Payflow Standard, Payflow Link, Payflow Pro… Jesus. Seriously PayPal? I think their product managers really need to sit down in a room and not leave until they have narrowed their option to 2 or 3. You know what happens when a customer has too many choices? Their head starts spinning trying to figure out which option is the right one for them and this just ends up frustrating many people who stop worrying about it and go somewhere else.
Now PayPal is probably the biggest and best known system out there, but there are several other companies who offer you a way to charge your customers for the products they purchase from you. Authorize.net, Google Checkout and Stripe are amongst some of the big ones. However, there is a key difference between some of these services. Some of these offer the entire payment solution, some only offer a payment GATEWAY. What is the difference you may ask? Well, to put it simply: in order to take credit card payments on your own website, you need both a payment gateway (a secure way to accept the transaction between you and your customer) and this HAS to be tied to a merchant account. Now, you can open a merchant account with your own bank or simply go with a company that offers the entire solution so that they can open one for you with their bank of choice. Both options have their pros and cons. If I went to my bank and opened a merchant account, I’d first of all require a business account. Their setup fees are kinda step as well, usually somewhere around $99 for setup and then a monthly fee of $30 plus they’ll charge me a percentage of the total plus a fee per transaction. I believe last time I talked to my bank they offered me a 1.5% and $0.17 per transaction. Now, not only would I need this, I’d also have to find a payment gateway, either by using Authorize.net or Payflow from PayPal. What a freakin’ headache.
Now if I wanted to go with an online company that provides the entire solution, there usually are no setup fees involved, the monthly charges are the sam, but the cost per transaction is higher. PayPal and most of the big online providers will take a 2.9% of the total plus $0.30 per transaction. These fees also change depending on the kind of volume that you produce. All in all though, don’t give yourself too many headaches and just go with the entire solution. If you are still confused about this whole thing, here is a video from PayPal that explains it pretty well:
PayPal Gateway Explanation
So… what does all this have to do with you my fellow eCommerce mogul? Not much at this point really. Sorry for making you read all the stuff above but I wanted you to get a better idea of where you are right now and where you might be in a short time so you can adapt when the time comes. For now though, we will stick to the free option and that is PayPal Payments Standard. This option is perfect for starters. Yes, it will redirect your customer to PayPal’s website when they checkout and then return them to your website, but it’s free and at this point you won’t have to mess with any further integration. All you gotta do is signup for an account, and then plugin the email associated with your account in Jigoshop like I’ve highlighted below. Yes, that’s it! The hardest part is also the easiest, although it’s important that you understand why I’m recommending this for now. Please also make a note that I’m unchecking the “Enable Cheque Payment.” Who sends checks nowadays?

I plan to write an advanced tutorial in the future to implement an integrated solution where your customer doesn’t leave your website at all throughout the entire checkout process. This is obviously the best way to go in order to give your user the smoothest check out experience. I’m strongly leaning towards doing it with PayPal Payments Advanced since it’s only $5/mo. added to their transaction fees. This means that we will need another type of solution that is more powerful than Jigoshop but still pretty affordable. I’ll keep you posted on this.
Anyways! That’s all I got for payment systems at this point! Hopefully you are a little more comfortable with the whole eCommerce payment solution conversation. Next chapter we’ll FINALLY start adding our products! YEAH BUDDY.
Chapter 9: Adding PHYSICAL products to your brand new eCommerce store
I hope you enjoyed your break and are ready to go because we are about to start getting into some good stuff in this chapter. We will be adding physical products to our WordPress site by using the awesome Jigoshop plugin. We’ll save the digital goods for the next chapter. Ready to do this? Read on then!
Let’s say you want to sell cowboy boots on your new e commerce store. How would you go about doing that? Well first things first. You have to take some pictures of your products! Now, taking a professional looking photo is a tutorial for another day, so just try your best to get a good looking picture of your product, save it on a folder in your computer you remember and then read on.
Step 1: Click on the small down arrow next to Products to open up that menu in case it’s not open already. Now click on the “Add New” submenu as shown below.

Step 2: As you can see in the highlighted areas in the screenshot below, I have added a title and a description to our new product. For demonstration purposes, I am simply using dummy text (“Lorem Ipsum”) instead of an actual description. Don’t get freaked out. I’m not secretly cursing you in Latin or anything like that.

Step 3:
Now we’ll add something that every product needs to have: some good looking product images! Scroll down slightly until you see the “Featured Image” section on the right hand side of the WordPress interface. Click “Set Featured Image.”

Step 4: The background will dim and a new pop up box will appear. This is WordPress’ media uploader where you can upload files such as images, audio, and video to your website. Click the “Select Files” button.

Step 5: A file upload dialogue box will appear so you can select which file to upload. Navigate to the location in your computer where you have your product images, select your files (hold down the CTRL/CMD button on your keyboard to select multiple files at once) and then click the “Open” button.

Step 6: You will see a small preview of your image along with other information such as file name, dimensions, etc. We won’t bother with most of these except for a pretty important one: Alternative text. Type in a description of your images in the highlighted box. For example, you can type in “Cowboy Boots for Men.”

What the heck is alternative text and why should I bother you may ask? Well little Timmy, alternative text (or alt text as we geeks call it) is the text that is used by computers to make sense of pictures. This is especially useful for people who are blind or may have severe visual impairments. By using their browser and special computer software that reads web pages aloud to them, handicap users can make sense of your website and its contents. However, if you choose not to include any alternate text, your users will end up being confused, frustrated, and will ultimately leave your site. Don’t simply do it because there are millions of handicap users that surf the web every single day and it also improves your SEO (which is a topic for another day), but do it simply because it’s the right thing to do.
Step 7: Now we’ll set the picture that we want to use as our main picture. This image will be the one that will be shown in a thumbnail along all other products so make sure it’s a good one. In this case, I’ll go ahead and select the picture the shows the entire boot and not just the close-ups. Scroll slightly down the page until you see the “Use as a featured image” link as highlighted below. Click on it once.

Step 8: Now that your pictures are ready, we’ll go ahead and set the price for this pair of boots. Underneath the body of the post, where you typed in your awesome product description, you’ll see another section named “Product Data.” It’s here that we’ll add all the important information necessary such as retail price, sale price (if the item is on sale), etc. As you can see in the screenshot below, I went ahead and set the retail price for this specific set of boots at $99, and the sale price at $79 in order to provide further incentive to my potential customers to buy.

Step 9: Your next step will be to switch to the “Advanced” tab next to the “General” tab so we can set the dimensions for our boots, as well as the weight for shipping calculation purposes.

Step 10: After this, let’s switch to the “Inventory” tab. If you only have a certain quantity of the product and don’t want people to order more than you have in stock, make sure you check the “Manage Stock?” checkbox and set your “Stock Quantity” field. This way, Jigoshop will keep track of your sales and automatically adjust your inventory number every time you have a sale. You can also choose to allow backorders, while letting your customer know this as well.

One important thing to remember is to setup a category for our new product. You’ll be able to use this in a later part of this tutorial (just trust me on this one!). It’s pretty simple really. Just click the “Add New Product Category” on the right sidebar as shown below.

You’ll see a new field where you can type in your new product category. I’ll type in “Men’s Boots” because these pair of boots is for men only. Once I do that, I can click the “Add New Product Category” button.

BOOM. Your new product has now been assigned to a category. Always remember to assign your products to a category since this is crucial later in this tutorial for your sidebar navigation and how customers will be able to check out your items by category.

Step 11: We are done setting up our very first product. How about that? Now, all you gotta do is hit the blue “Publish/Update” button on the right hand side and your very first product will be live on the front of your store. Once you save, you can check out your product by clicking the “View Product” button at the top of your Product page as shown below.

Step 12: If everything went according to plan, you should have something similar to what I have below. Congratulations! You made it this far and it all finally paid off! Your product is now ready for the world to see and purchase. Oh, what a feeling indeed!

I think you deserve a nice refreshing drink while I create a few more products for my own test ecommerce store. Once you come back and go to the next chapter, we’ll talk about adding digital products to your store which will be a walk in the park compared to physical goods. Onwards!
Chapter 10: Adding Digital Products to your eCommerce store
Fortunately, the process for creating a digital product is very much the same as with a physical product inside Jigoshop. Let’s get started then.
Step 1: Add a new product by clicking “Add New” underneath “Products” on the left sidebar once again. Type in a title for your product and a description. In this case, I’ll be adding an eBook in PDF format as you can see below. Remember to take some time to come up with a good description for your product!

In the “Product Data” section, under the product description, we’ll change a few settings in the “General” tab. Make sure to change the “Product Type” to “Downloadable.” I’ll then set the price for my eBook to $9.99.

If you noticed, a new tab called “File” is now available. Let’s switch over to that tab. As you can see, here is where you’ll be able to upload your digital product file. Click the “Upload a file” button as shown below.

Just like we when we uploaded a picture for our product, we’ll now use WordPress’ file upload feature to upload our PDF.

Once you select the file on your hard drive, you’ll see that WordPress will present you with a screen like the one below. At the bottom, click the “Insert into Post”.

Doing this will insert the exact file location (now on your server) where your customers will be able to download the file from. I’ll show you exactly how this is gonna work a little bit later in this tutorial.


The final step to setup our new digital file will be to insert a product image. Just like we did for our physical product, click the “Set featured image” link on the right sidebar.
Select the image from your hard drive. You may have to click the “Upload Files” link on the top left corner first. Once you have your picture selected as shown below, click the “Set featured Image” button.

We’re good to go! We can now check out our brand new eBook product page by clicking the “View Product” button at the top of the page as we did before.

BOOM! We now have our new digital product available for the whole world to download. Isn’t that something? Our store is finally coming together. In the next chapter we’ll give our store a more custom look and clean up a few things to really give our store a more polished look. It’s gonna be awesome.
Chapter 11: Customizing the look of your eCommerce store
We now have a functional eCommerce store. How easy was that? In order to give our store a more polished look, we’ll change a few things within our WordPress theme to give it a more unique look that fits better with the type of products that we’ll be selling.
First of all, we’ll be customizing one of the themes that WordPress comes with right out of the box. The theme we’ll use is “Twenty Eleven” so in case you are not inside the back-end of your WordPress site, go you can always click the title of your website at the top of the bar like highlighted below. This will always take you back to your “Dashboard.” Remember that if you can also get to your Dashboard by going to http://www.yourowndomain.com/wp-admin and using your login credentials in case you ever get logged out of your WordPress site automatically. The good thing about the top navigation bar is that if you are inside the Dashboard and want to check out a preview of your site at any time, simply click the link on the top again.

Once back inside the safety coziness of your dashboard, look at your menu sidebar and go to “Appearance” and click the “Themes” submenu as shown below.

Depending on when you installed your copy of WordPress, you might have the Twenty Eleven theme listed already as a “Current Theme,” but just in case you don’t, all you gotta do is look below where WordPress shows you the “Available Themes” and click the “Activate” link as highlighted.

Now the have the “Twenty Eleven” theme active, we’ll click the “Customize” link in order to make some changes.

As you can see, inside this page, we’ll be able to easily change some settings on our “Twenty Eleven” theme to give it some life. First of all, click the “Site Title & Tagline” menu. You’ll see a drop down of choices. We’ll go ahead and uncheck the “Display Header Text” option. This gets rid of the plain, boring text at the top of your site and gives us a chance to integrate a logo right on the main banner.

Next, let’s change the color of our links. Blue just doesn’t go very well with our western theme that we are trying to go for. How about a burnt orange for Texas? Yeah, I bet that looks pretty good. Just click on the “Colors” menu and select your color from the color picker as shown below. Once you are happy with the color, we can move on. You can also change the background color here if you wish. Do some experimenting and go with the style you’d think appeal most to your customers. My advice here would be NOT to overdo it!

I decided to slightly change the background color, as well as the sidebar position. You can do by cliking “Layout” and then selecting the “Content on right” option. This is completely up to you and not a big deal at this stage in the game.
You also have a background image if you’d like by setting it under the “Background Image” menu. Again, don’t go too crazy here. If it’s a small image, you’ll need to make sure it’s a “tile” image, which means it was designed to be repeated horizontally and vertically seamlessly. If you do a Google search for “tiled backgrounds” you’ll see what I’m talking about. The good thing about a small tiled image is that the file size is smaller and therefore will allow your site to load faster. On the other hand, if you want a more eye-catching background but don’t mind slowing your site down a little, go with a bigger picture. Like I said before, this is completely up to you. Once you are happy with your changes, click the “Save” button at the top, and then the “Close” button.
Now, something quite important here. Right now and by default, WordPress will take a user to your “blog” page by default when somebody goes straight to your website. We’ll change this so users will see our store as the main homepage by opening the “Static Front Page” menu, selecting “A static page” choice under “Front Page Displays,” and then selecting the “Shop” item inside the “Front Page” drop down as seen below.

Now for a really cool one. The main banner image! Click the “Header” option on the left sidebar as indicated below.

As you can see inside the “Header” page, you’ll get a preview of what your main banner image looks like and it is here that you can change it to something else. Keep in mind that the size of our banner is 1000px wide by 288 high so we’ll keep those same dimensions for our image.

I understand of course that you may not have access to stupidly expensive software programs like Photoshop, but that’s no biggie! There’s plenty of free tools out there to help you create a quick banner graphic. One that I personally like is called Pixlr. It’s 100% free and works remarkably similar to Photoshop. It even has a lot of the same powerful features like adding text shadows and other effects. It’s pretty amazing when you think it’s just a web app. If you ever used Photoshop in your life, you’ll feel right at home within their user-interface.
For this particular tutorial, I simply Googled images of cowboy boots and came across the excellent work of fellow Texan John Pesina who is an Austin-based photographer. You can check out more of John’s work here if you are interested. Anyways, I used Pixlr Advanced to create a nice banner image with the dimensions 1000px x 288px as you can see below. If you wonder about the logo and tagline, I used the text tool to create those. Took me only 5 minutes!

Once you save your image, we can upload it to our WordPress site by clicking on the “Header Image” option and then clicking on the little thumbnail of your current banner to open up the file upload box.

Once you do this, select the file from your hard drive and make sure to click the “Upload” button next to the “Choose File” field. WordPress will take you to another screen in case you want to crop your image. Click the “Crop and Publish” button and you are good to go!

Looking sharp! Now, we’ll take care of that silly sidebar that was made for blogging and we’ll customize it with some more relevant information about our store. Underneath “Appearance,” click the “Widgets” option to be taken to that particular page.
Here you’ll be able to see all widgets you can easily add to your website’s sidebar by simply dragging and dropping them inside the “Main Sidebar” section as highlighted below.

As you can tell, currently we have a bunch of widgets that are primarily used for blogging, so we’ll go ahead and get rid of them. Let’s delete the “Search” one first (since we already have one built in the navigation), by clicking the drop-down and then hitting “Delete.” BOOM! See ya later Search! And if you ever want to bring any of these back from the grave, simply drag & drop them from the left area where your “Available Widgets” are listed and into the “Main Sidebar” area. Yep, that easy.
I’ll go ahead and remove all my widgets for now and start with a clean slate. After that, I’ll go ahead and drag and drop two important widgets for my store: “Jigoshop: Product Categories” and “Jigoshop: Products On-Sale.” I’ll give them a title that I want to show up as the heading for each one of these new widgets and make sure to click the “Save” button on each.

Let’s switch over to the front-end of our store and voila! If you created a category for your products when you were adding them to your store back in our previous chapter, you’ll now see all our categories listed on the sidebar and your customers be able to see all the men’s boots that have the “Men’s Boots” category assigned to them!

On top of that, our store will now automatically showcase all the products that are marked “On Sale” under our new “Inventory Reduction Sale” heading. How is this happening? Remember when we were creating our products in addition to setting a “Regular Price”, we decided to also set a “Sale Price”? Well, for every product that has a “Sale Price,” Jigoshop will list it under this section as well!
This will all happen automatically from now on so you don’t have to keep updating your sidebar all the time. This is where all your hard work setting up your store properly will finally pay off. In our final chapter, we’ll tie up some loose ends and wrap up this tutorial! Oh, man. I can’t believe it’s almost over!
Chapter 12: Putting the final touches on your new eCommerce store!
Our new store is looking awesome and we are ready to really start adding all types of products to it. However, before we do that, we’ll take care of a few things to make the website a little more user-friendly.
First of all, we’ll look at the navigation. Jigoshop is awesome right out of the box, but for some unknown reason it decides to clutter your navigation with main menu items. These could be better arranged under one main menu so we’ll take care of that first.
Inside you “Dashboard,” go to “Appearance” and click “Menus.” You’ll see a page that looks like the one in the screenshot below. Type in a menu name and click the “Create Menu” button.

Now, we’ll assign this as our primary menu by selecting it from the drop-down in the “Theme Locations” section on the top left.

We now have a new menu assigned to our theme. However, we got no menu items! Let’s take care of that by checking all the pages that we will be adding to our brand new WordPress navigation menu, and then clicking the “Add to Menu” button.

Now, you’ll see a list of blocks for all the pages you checked as seen in the screenshot below.

Next, we’ll use the power of WordPress to create some drop-down menus in seconds and organize our navigation a little better. All you will do is simply drag and drop underneath and to the right of the menu you’d like to make the parent menu. You can even rearrange your main menu items. In my example below, I rearranged the “Shop” menu to be first, followed by “My Account,” and finally “Cart.”

That’s looking a lot better. However, since I setup my homepage to be my store page, I don’t want my store page to say “Shop” but “Home” instead. Changing this is super easy. Simply click the drop down where it says “Page” and type in “Home” underneath “Navigation Label.” Make sure to click the “Save Menu” after you are completely done. Now, let’s check out our new menu by visiting our store:

That’s nice! Much better organized menu and you now have a lot more room for other future pages (a tutorial for another day!).
Guess what folks. We are done! If you made it this far, I commend you! I’m very happy you stuck with it. That just shows your commitment to your new business! You should be very proud of what you’ve accomplished so far, but don’t get too confident now! This is just the first part of your adventure! We’ve focused on building this website with as little resources and as quickly as possible. The major part of it still is up to you, promoting your new website and drive traffic to it through word of mouth online and off.
If you are truly serious about your online business, then you’ll want to take it to the next level by improving your new website by setting up things like integrated payment systems, providing promo codes, creating a one-of-a-kind look for your website, etc. I plan to write an Advanced Tutorial in the near future just for this purpose. And of course, it’ll be free as well. Let me know if you’d be interested to know when this tutorial is available by sending me an email to [email protected].
Until then, wish you the best of luck in your new online adventure and hope you are now one step closer to realizing your dream!
Sincerely,
John