WooCommerce is a powerful platform, but it can be intimidating at first if you’re new to ecommerce. There are a lot of features you need to get acquainted with if you want to run a successful operation, and you may not be sure where to start.
Your first step should be to learn about what WooCommerce is and what it can do for your ecommerce site. Then, you can begin to make sense of the platform’s main features, how they work, and the steps you’ll need to take to turn your fledgling store into a successful one. This may sound like a lot of ground to cover, but if you have the patience for some upfront work, you’ll reap the rewards over the long term.
In this guide, we’re going to teach you everything you need to know about WooCommerce, including how to set up the platform, build your store, add products, and more. Let’s jump right in!
An Introduction to WordPress and WooCommerce
WordPress is a powerful platform you can use to build almost any type of website. However, one of the things it can’t easily do is enable you to set up an online store. At least, not without the help of an ecommerce plugin.
That’s where WooCommerce comes in. This popular plugin includes most of the essential features you’ll need to set up an ecommerce site. The base plugin is 100% free, and there are plenty of modestly-priced extensions that can extend your options even further.
In this chapter, we’ll explain why you should consider using WordPress and WooCommerce to create your online store. Then we’ll guide you through the process of setting them both up. Let’s get to work!
The Benefits of Using WordPress and WooCommerce for Your Ecommerce Site

WordPress is a very popular Content Management System (CMS) you can use to create a website in a matter of minutes. While it’s somewhat limited by default, you can add almost any functionality you’d like with the aid of a plugin.
To put it simply, plugins are add-ons that can extend WordPress core in various ways. There are plugins that enable you to create custom contact forms, and even some that make it possible to sell items online and process payments. WooCommerce falls into that second category.
Although it’s hardly the only ecommerce plugin available for WordPress, WooCommerce gets our vote as the best platform for several reasons:
- It’s free. The base plugin is free, although there are also premium extensions (we’ll talk more about those later).
- It’s easy to learn. If you’ve spent some time using WordPress, WooCommerce should come naturally to you.
- It’s very popular. The more widely used a plugin is, the easier it will be to find help if you run into a problem.
Now we’ve explained why these platforms are a smart bet, let’s talk about how you can use them to set up your own online store.
How to Set Up WordPress and WooCommerce (In 3 Easy Steps)
If you don’t have a WordPress website yet, don’t worry. Getting the platform up and running is pretty simple. Let’s take it from the top.
Step #1: Register a Domain Name and Pick a Web Host

Many people register their domains through their web hosts, but we recommend keeping the two separate so you can easily hold on to your domain name if you change hosts. For example, you can use a dedicated service like Namecheap to choose and purchase your domain:

After that, you’ll need to find a good web host to set up your site. SiteGround is one of the top options available for WordPress, since it’s beginner-friendly, highly scalable, and quite affordable:

If you’re looking for a more hands-off experience, you can always opt for a managed hosting platform such as Flywheel. Just keep in mind that these types of services tend to be more expensive.
Once you’ve chosen a web host, you’ll need to pick a plan. If you’re new to ecommerce, we recommend getting a basic shared hosting plan, since you can always upgrade later if you need to. Once you’ve registered and paid for your subscription, you can move on to the next step.
Step #2: Install WordPress on Your Chosen Host
This may be the easiest part of the setup process. While WordPress can be installed manually, most hosts enable you to set up the platform using a simple installer that can be accessed from your control panel:
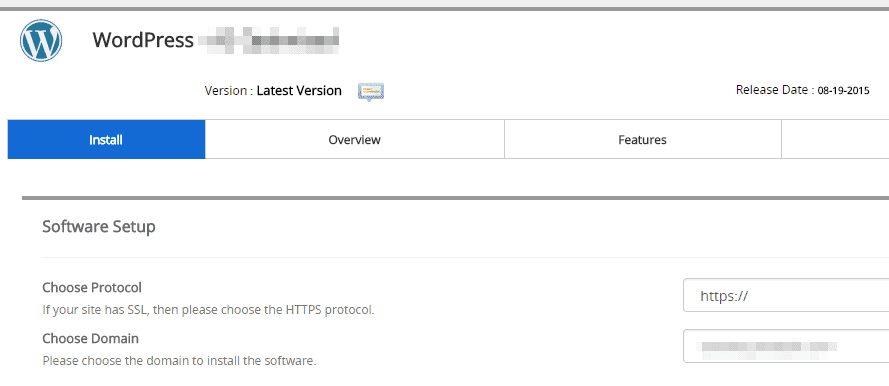
The installer itself varies from host to host, but generally all you need to do is enter some simple settings, including your site’s name, its domain, your admin credentials, and so on. If you decided to go with SiteGround, you can check out this tutorial on how to use their installer.
Step #3: Install and Activate the WooCommerce Plugin
The final step is to install WooCommerce and activate it. First, log in to your new WordPress site and look for the Plugins tab. Click on it, then select the Add New button at the top of the screen:
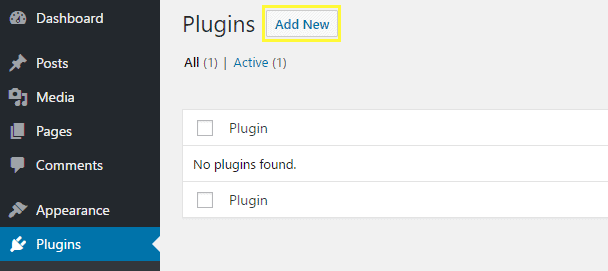
On the next screen, use the search feature on the right to look for the WooCommerce plugin. There are plenty of add-ons for the platform, so make sure you pick the base plugin. Once you’ve found it, click on Install Now:

After a moment, the Install Now button will be replaced by an Activate option. This means that the plugin is set up, but not yet running. Once you click Activate, WordPress will do its thing and WooCommerce will be good to go! We’ll talk more about how to configure its settings in the next chapter.
Conclusion
If you’ve decided to create your site with WordPress, WooCommerce is practically the default choice for setting up an online store. It’s one of the most polished and comprehensive ecommerce solutions. Plus, it’s pretty intuitive if you already know your way around WordPress (but it’s also easy to come to grips with if you don’t).
If you’re ready to build your own ecommerce site with WordPress and WooCommerce, simply follow these three steps:
- Register a domain name and pick a web host.
- Install WordPress on your chosen host.
- Install and activate the WooCommerce plugin.
Now that your site is set up and you’ve activated WooCommerce, it’s time to configure the plugin. There are still a lot of features to discuss, so let’s get on with chapter two!
Getting Started With WooCommerce
WooCommerce offers a lot of options, but it’s relatively easy to get started with the platform even if you don’t know much about ecommerce. In fact, WooCommerce comes with its own setup wizard to guide you through your store’s basic configuration.
However, the setup process doesn’t cover every element you might want to configure before launching your site – it just tackles the basics. WooCommerce packs in plenty of additional features that can add value to your store, such as the ability to customize each of your products and support extra payment gateways.
With that in mind, this chapter will cover the three basic steps to getting started with WooCommerce after you’ve installed the platform. Let’s jump right in!
Step #1: Complete the Onboarding Wizard
As soon as you activate WooCommerce, the plugin will transport you to its onboarding wizard. This is a simple tool that will walk you through WooCommerce’s basic settings. To kick things off, click on the Let’s Go! button.
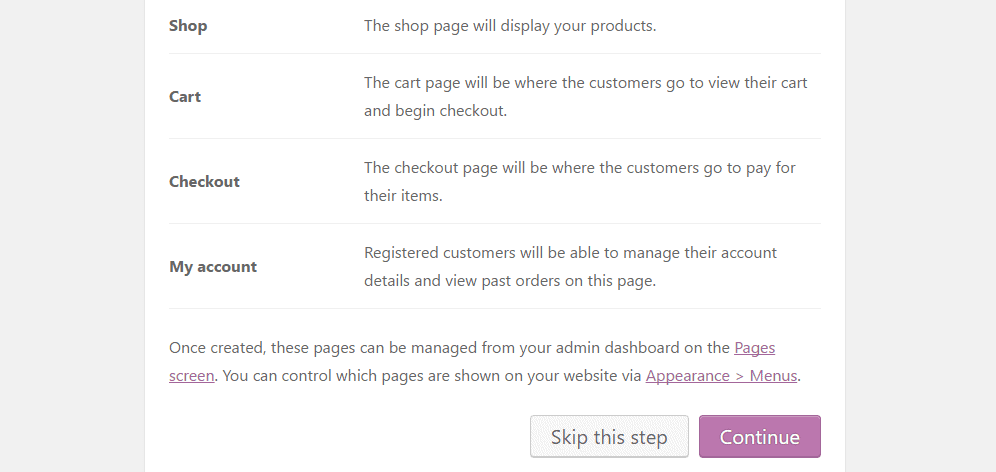
On the first screen, you’ll see that WooCommerce can create four essential pages just about every store needs: My account, Checkout, Cart, and Shop pages. These sections will ensure that your site has the basic functionality you need to start making sales right away, so select Continue to proceed:
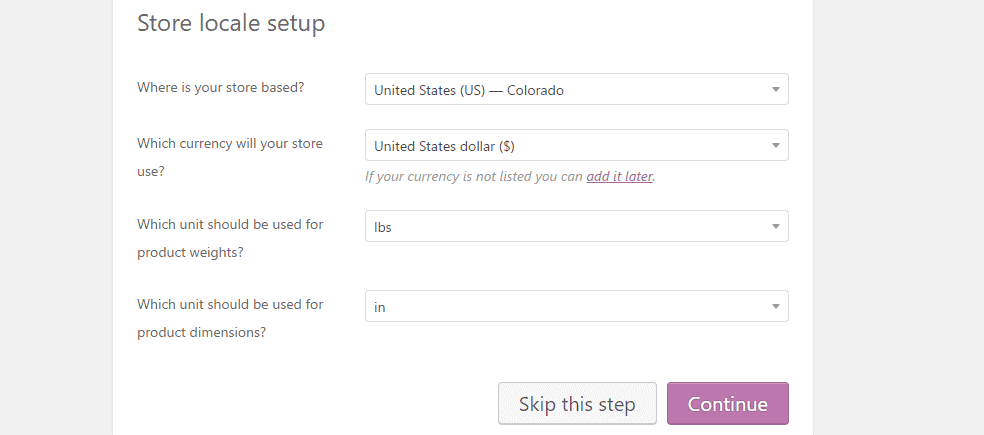
In the next section, you’ll be able to choose the location of your store and which currency you want to use. You can also configure a few extra settings, such as which units your store will use to measure and weigh your products. Once you’re done with these options, click on Continue again:
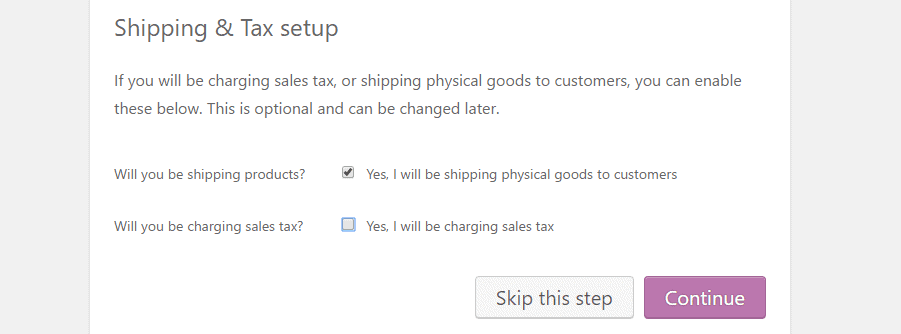
The next screen is rather straightforward. All you need to do is tick a box if you’re going to ship physical goods, and another if you want to charge sales tax through your store. Naturally, both of these settings are up to you:
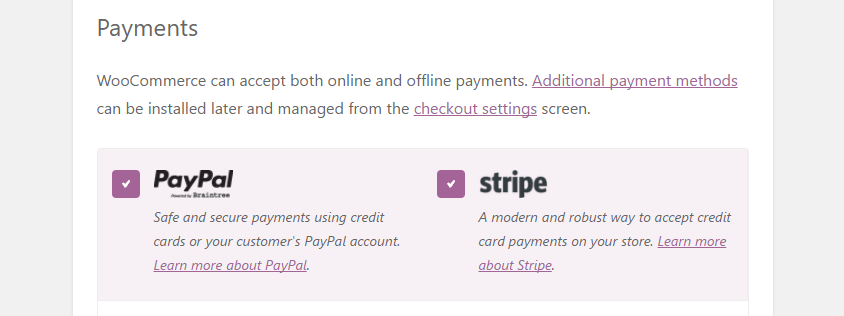
On the final screen, you’ll be able to choose which types of payments you want to accept in your store. By default, WooCommerce only enables you to accept PayPal and Stripe, but we’ll teach you how to add other options in a moment. For now, enable the payment types you want to support:
That’s it! Now your store is almost ready to go live; all that’s left is to add some products.
Step #2: Add Your First Product(s)
The first thing you’ll want to do after installing WooCommerce is set up your product catalog. To do this, go to your WordPress dashboard and look for the Products tab, then click on the Create Your First Product! button:

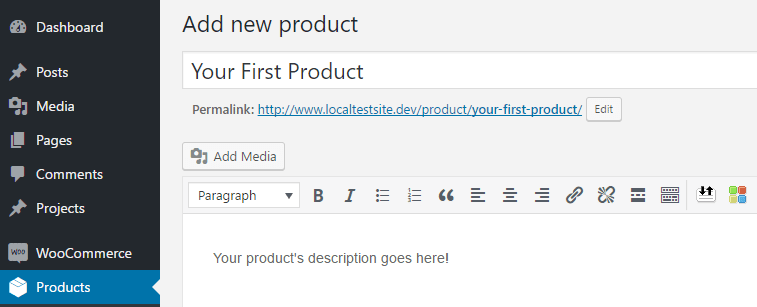
You’ll find yourself in the WordPress editor, albeit with a few new widgets. For now, just type in a name and description for your product:
Then scroll down until you see the Product data widget, and click on the drop-down menu. Here, you’ll be able to specify what type of item this product is. If it’s digital, you should also tick the Virtual box:

After that, you can set a price for your product using the General tab under Product data, and indicate if it’s in stock in the Inventory settings:

Once you’re done, all that’s left is to upload a featured image for your product. You can also add a few more pictures of it using the Product gallery widget, so customers will have a better idea of what they’re purchasing. Then click on the Publish button, and your first item will go live.
Step #3: Enable Additional Payment Gateways
WooCommerce ships with PayPal integration by default, and it can also enable you to accept checks, cash on delivery, and bank transfers. However, there’s a good chance you’ll want to add additional payment gateways to reach more users.
To do this, you’ll need to use WooCommerce extensions, which are similar to WordPress plugins. We’ll talk more about how to set up extensions in the next chapter. For now, it’s important to know that you can find all the payment options you’ll need under WooCommerce > Extensions > Payment Gateways:

All you have to do is click on the gateway you want to add, and you’ll be sent to its official extension page. There you can choose which type of license you want to use and download the files you’ll need to set it up. Keep in mind that not all WooCommerce extensions are free, so you’ll want to focus only on the payment gateways you think your customer base will actually use.
Conclusion
WooCommerce may pack in a lot of options, but you don’t need to be intimidated by its scope. In fact, the platform as a whole is relatively easy to use, thanks to its integration with WordPress. You can set up WooCommerce and configure its essential features in a matter of minutes.
To recap, here are the three steps you’ll want to follow to get started with WooCommerce:
- Complete the onboarding wizard.
- Add your first product(s).
- Enable additional payment gateways.
In the next chapter, we’ll going to talk more about WooCommerce extensions. We’ll explain how they can help you, and introduce some of the best options. It’s an important topic, so read on!
Everything You Need to Know About WooCommerce Extensions
WooCommerce extensions are one of the platform’s most useful features. However, much like WordPress plugins, the plethora of extensions available to download means finding the right ones for your site can be challenging.
In a nutshell, it’s a smart idea to begin by checking out some of the most popular WooCommerce extensions and asking yourself if they’re a good fit for your store. That way, you won’t be stuck with any extensions you don’t really need.
In this chapter, we’re going to show you how to get started with WooCommerce extensions, and explain their key benefits. Then we’ll recommend four of our favorite picks for new and established stores. Let’s get the ball rolling!
What Are WooCommerce Extensions?
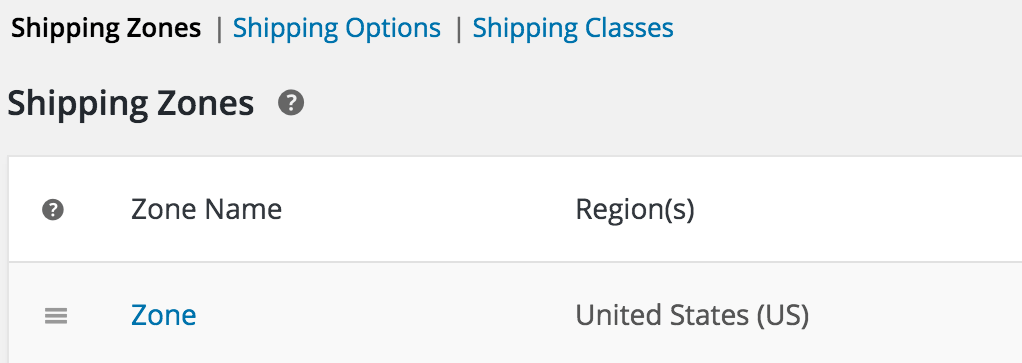
Extensions are WooCommerce’s version of WordPress plugins. They fulfill a similar role by enabling you to add extra functionality to your site. If you’ve followed along so far, you should have a fully-working WooCommerce store ready. So now let’s touch on the two main benefits of using extensions:
- You can add more powerful features. WooCommerce comes with most of the basic ecommerce functionality you’ll need, but you’ll probably want to use extensions to add more advanced options.
- They’re easy to set up. Remember how we set up the WooCommerce plugin in an earlier chapter? Installing extensions works the same way, although they’ll only function if WooCommerce is active on your site.
In fact, we’d go as far as to say the only potential downside to WooCommerce extensions is that some of them can be a bit expensive. There are reasonably-priced and even free options available, but in some cases you’ll need a decent budget if you’re looking to expand your store’s functionality.
2 of the Best WooCommerce Extensions for New Users
Now that we’ve made our case for WooCommerce extensions, let’s start with two options that should appeal to new store owners.
1. WooCommerce Google Analytics (Free)

Google Analytics is a powerful tool that provides you with data on your website’s visitors, which helps you make smarter decisions. WooCommerce Google Analytics enables you to integrate your new store with Google’s platform, and keep track of how your store is performing from your dashboard.
Using this extension, you’ll be able to track users’ behavior within your store, discover which products interest them most, determine what they’re looking for, and even discover what they’re not finding. Plus, there’s also a premium option you can upgrade to, should you want more features.
2. WooCommerce MailChimp ($49)

Email newsletters are one of the best ways to stay in touch with past visitors and promote new deals to an interested audience. WooCommerce MailChimp enables you to integrate your store with the MailChimp email marketing service, which makes it possible for you to send out personalized emails
This extension enables users to sign up to your email list during the checkout process. You can then configure it to send out emails based on specific customer data and purchase history. For example, if you want to target past customers in a particular region, WooCommerce MailChimp makes that possible.
2 of the Best WooCommerce Extensions for Established Stores
Once you have a bit more WooCommerce experience under your belt, you might want to add some advanced features to your store. Let’s check out two extensions that fit the bill (although there’s nothing stopping new store owners from picking them up as well).
1. Product Bundles ($49)

Offering product bundles is a time-tested way to increase your store’s sales. While we wouldn’t want to tell you what kind of goods to include in your bundles, we can recommend the perfect extension to add this functionality to your store – Product Bundles.
Along with enabling you to bundle multiple products for sale, this extension also supports virtual and subscription-based items. That means you can create any type of bundle you want.
2. WooCommerce Freshdesk ($79)

Excellent customer support is one of the things that sets the good stores apart from the bad, and WooCommerce Freshdesk can help you improve yours. This extension lets you integrate your store with the Freshdesk service, which in turn enables you to receive and manage support tickets.
On top of that, the Freshdesk service also lets you set up a knowledge base for your store. That way, your users will be able to troubleshoot problems on their own (if necessary).
Conclusion
Just like WordPress plugins, WooCommerce extensions come in all flavors and sizes. The process of installing them is simple, and you can find hundreds of excellent options in the WooCommerce repository.
Here are some of our favorite extensions to get you started. The first two are ideal for stores that are just starting out, and the last two are perfect for advanced users:
- WooCommerce Google Analytics: This is probably the best way to integrate Google Analytics with WooCommerce.
- WooCommerce MailChimp: Grab this extension if you want to use your store to create better email marketing campaigns.
- Product Bundles: This extension is a smart way to bundle your products and sell them together.
- WooCommerce Freshdesk: With this extension, you’ll be able to create and manage support tickets.
Now that we’ve covered the basics of how to use extensions, it’s time to check out some outstanding examples of stores built with WooCommerce. Then, we’ll tell you how to use themes to make sure yours looks just as good!
Outstanding Examples of WooCommerce Sites (And How to Replicate Their Success)
WooCommerce offers plenty of practical features for setting up an online store, but the platform isn’t just about functionality. It also helps you easily customize your store’s style, so it looks stunning.
The simplest way to do this is by using WooCommerce themes, which work just the same as their regular WordPress counterparts. What’s more, these themes provide you with a collection of features you can use to create a visually appealing store without starting from scratch.
In this chapter, we’re going to introduce you to some examples of stylish WooCommerce stores that can serve as inspiration. Then we’ll guide you through the process of choosing the right theme to make your store stand out. Let’s get started!
5 Examples of Outstanding WooCommerce Sites
For this roundup, we decided to focus on some of the most creative and stylish WooCommerce stores we could find. Let’s talk a bit about what makes each of them worth checking out.
1. Sodashi

Sodashi is a skincare company based in Australia, and its website uses a modern, almost minimalistic style. The products themselves feature gorgeous screenshots and instructions, which is a smart touch.
2. Roberto Coin

Roberto Coin is the name of both the brand and designer behind this fashionable jewellery store. Each page on its website is dominated by large, elegant screenshots that give off a luxurious feeling.
3. Striiiipes

The Striiiipes brand provides colorful, fashionable accessories for your day-to-day life, and its site reflects that focus. If you’re looking for an example of how to let your product images do the talking, this is a perfect place to start.
4. BetterBody Foods

As you might imagine from its name, BetterBody Foods focuses on helping you achieve a healthier diet. Its store page echoes that goal, thanks to its choice of colors and design, and makes excellent use of micro interactions to keep you interested.
5. Sweet As Cakes

The Sweet As Cakes homepage is an excellent example of how to customize your WooCommerce store to match your business’ style. This site’s use of typography and colorful images is right on point. Plus, the designers had the foresight to include a map, which is always a smart move.
How to Find Awesome WooCommerce Themes
Now that you’ve seen some inspirational examples of what you can achieve with your WooCommerce store, chances are you’re ready to find your own awesome theme. Fortunately, WooCommerce themes work the same way as regular WordPress themes. The only difference is that they include features specifically designed to integrate with WooCommerce.
Of course, you could use a standard WordPress theme – many fully support WooCommerce. However, WooCommerce-specific themes are built from the ground up with the ecommerce platform in mind, so they’re often a smarter bet. There are some excellent free choices out there, and you can also find premium options that include more features for a set price.
When looking for themes, you’ll want to keep an eye out for those that meet the following criteria:
- Recent updates: Themes that are regularly updated are more secure, and less likely to cause conflicts.
- High user ratings: The better the ratings, the better the product (in most cases). It’s also a good idea to check out reviews.
- Functionality relevant to your niche: Even among WooCommerce themes, there are plenty of options specific to particular industries and businesses.
With this in mind, let’s talk about two of the best places to find high-quality WooCommerce themes.
The WooCommerce Theme Store

WooCommerce’s theme store should probably be one of your first stops after installing the plugin. You can find a few outstanding free options, such as the company’s flagship theme Storefront (which also offers several child themes). Plus, the store features a broad range of premium themes for multiple niches and all types of stores.
ThemeForest

Next up, ThemeForest is a massive repository for WordPress themes, and even features its own WooCommerce section. Inside, you’ll find hundreds of premium themes for the ecommerce platform, targeting a broad range of niches. If you’re looking for a theme that includes features relevant to your particular industry, ThemeForest is probably the right place to look.
Conclusion
It doesn’t matter if you’re new to ecommerce – WooCommerce makes it simple for anyone to create a stunning online store. Themes play a major role in that process. Armed with the right theme (and a little practice), you’ll be able to craft stores that rival or even surpass the examples we showed you earlier.
If you’re not sure where to start looking for your first WooCommerce theme, check out either of these options:
- WooCommerce’s theme store: A great place to find both free and premium WooCommerce themes.
- ThemeForest: The largest repository of premium WordPress themes.
Now that we’ve covered the basics of giving your store a makeover, it’s time to roll up our sleeves and talk business. In the next chapter, we’re going to discuss how to go about picking the right products for your store, so stay tuned!
How to Choose, Showcase, and Ship Your Products
One of the hardest aspects of starting an online store can be picking the right products. Unfortunately, it’s not as easy as setting up shop and selling the first items that come to mind. If you don’t choose your products carefully, your store might never find the customers you need.
Selecting the right products can be challenging, but there are ways to make the task easier. For example, you can study your competition, which should point you in the direction of products with a built-in customer base.
In this chapter, we’re going to talk about how to find and choose the right products for your store, and how to showcase them effectively. Then we’ll move on to explaining your shipping options. Let’s get to work!
How to Find (and Choose) the Right Products for Your Store

Selecting the right products to sell on your store is one of the most important decisions you’ll make. Even if you already have an idea for the kind of items you want to list, it’s smart to consider all your options. If there isn’t a market for your products, you want to find that out before your store opens for business. That way, you’ll have time to make changes to your items so they’re more appealing, or to switch directions entirely.
Sadly, there’s no magic list of products that will always sell. However, there are a few tips you can keep in mind to increase your chances of success:
- Check if there’s a demand for the items you want to list.
- Study the competition in your field to see what products they’re offering, and how they’re marketing those items.
- Think about ways you can improve on your competitors’ products.
That last step is particularly important. After all, competition is all but guaranteed in every niche nowadays, so figuring out a way to stand out from other stores is critical to your success.
How to Showcase Your Products for Optimal Conversions

One of the easiest ways to help your online store stand out is to showcase high-quality product photography. In fact, product photographs can be just as effective as strong copy when it comes to driving sales.
Think about it this way – product photographs are often the first thing visitors will see when they arrive at your store or click on an item. If yours look like they were taken by an amateur (or are too generic), those potential customers might not even bother reading about the product.
If you happen to be a professional photographer, you’re probably on top of this. However, no matter how little experience you might have, there are a few things you can keep in mind to make sure your photographs shine. For example:
- Use images that show your products in action, so people can imagine themselves using them.
- Showcase all available colors and styles.
- Try to shoot each item from different angles.
Of course, there’s far more to taking excellent photographs than these basic tips, and there are lots of useful tools that can help you. However, if you stick to these simple guidelines, your images should be a cut above many ecommerce stores.
How to Start Shipping Your Products via Dropshipping
A lot of online stores handle shipping manually, or hire services to take care of it for them. However, there’s a third option to consider – ‘dropshipping’.
This method not only enables you to outsource your shipping, but also provides you with a built-in catalog of products you can promote on your site. Therefore, you won’t need to worry about picking the right items or how to ship them. All you’ll have to do is market your products.
Choosing the right dropshipping service can be a daunting decision, since there are so many available. However, there are few things you can keep in mind to find the best one:
- If you’re considering a particular service, look for user reviews to see if they’re positive.
- Check the fee structure to see if there are any hidden charges.
- Calculate your final prices, taking that fee structure into consideration.
Keep in mind that even if you’re using a dropshipping service to fulfill orders, you still have a responsibility to your customers. It’s up to you to pick the right service so you won’t disappoint them!
Conclusion
Selecting the right products for your store is just as important as choosing the best platform and customizing its style. If you settle for items without enough demand, your store might never hit its sales goals, and you may end up in the red.
If you want your store to succeed, here are three things to remember when you start listing products:
- Pick the right items for your audience.
- Showcase your products with good photography.
- Settle on a shipping method (such as dropshipping) to deliver your orders quickly.
Now that we’ve covered products, it’s time to talk about how to maximize your WooCommerce store’s audience. To do that, we’re going to broaden your horizons and teach you how to turn your WooCommerce setup into a multilingual powerhouse. Let’s move on to the next chapter!
How to Offer Multiple Currencies and Languages in WooCommerce
Even the most successful online store will usually reach a plateau when it comes to attracting visitors. Breaking that ceiling can be difficult if you have a small product catalog, so you’ll want to find ways to make your store more appealing to a wider audience.
Fortunately, adding more languages and currencies to your WooCommerce store is a simple way to open up to entirely new markets. The best thing is that this way, you won’t need to expand your product catalog immediately. All you have to do is make sure your store is translated correctly, and you should start seeing a more diverse range of visitors.
In this chapter, we’re going to break down the reasons you should offer multiple languages and currencies in your store. Then we’ll talk about how to implement both features using plugins. Let’s get to work!
Why Your Store Should Offer Multiple Currencies and Languages

WooCommerce supports multiple currencies out of the box, but it only enables you to set one of them as your default. Similarly, WordPress requires you to choose one language for your site. In most cases this restriction isn’t a problem, but it can be a downside for an online store.
If you’re familiar with some of the ecommerce giants, you’ll notice that most of them have multiple stores to target different regions. That’s a valid approach, but you can also add support for more languages and currencies to an existing store, which might be an even better solution. Expanding your options this way enables you to:
- Reach a wider audience. The more languages your store supports, the greater its potential audience is.
- Simplify price calculations. Even if your store doesn’t support additional languages or currencies, you’ll probably get international customers from time to time. They’ll be stuck converting prices to their local currencies on their own, which isn’t ideal.
- Avoid setting up new stores. Managing one online store can be complicated, never mind multiple versions. This way, you only need to stay on top of a single site.
With these benefits in mind, let’s talk about how to implement multiple currencies and languages for your WooCommerce store.
How to Offer Prices in Various Currencies Within WooCommerce
As you might expect, adding multiple currencies to WooCommerce is possible thanks to a plugin. We’ll be using WooCommerce Currency Switcher, since it enables us to implement this functionality in a matter of minutes:

Go ahead and install and activate the plugin now. Once you do so, you’ll find a new Currency tab under WooCommerce > Settings on your dashboard:

Inside, you’ll see two different currencies, one of which should be your store’s default. Each includes the relevant abbreviation, symbol, description, and even a flag you can change if you want to.
All you need to do now is choose which currency you want to use as your second option. The free version of WooCommerce Currency Switcher only supports two currencies – if you need more, you’ll have to upgrade the plugin.
For now, let’s focus on adding one new currency to your store. You can find a list of currency codes online, and all you have to do is locate the one you want and type it into the Currency tab. Then save your changes, and your new currency will appear as an option in a drop-down menu for each of your products:
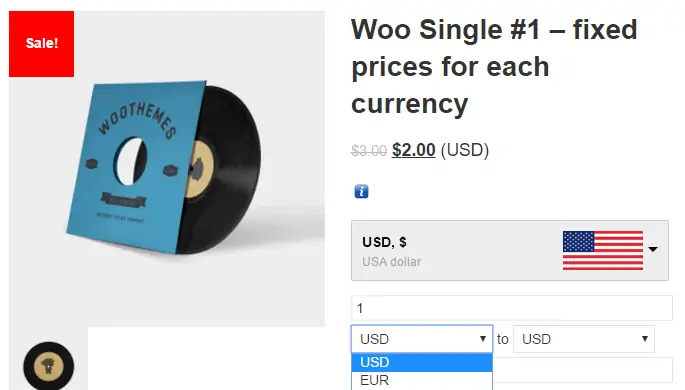
Now that we’ve tackled currencies, let’s talk about how to add additional languages.
How to Set Up a Multilingual WooCommerce Store
Adding new languages to your WooCommerce store is a bit more complicated than including extra currencies. The best way to do it is by adapting one of WordPress’ best multilingual plugins, WPML, to work with WooCommerce. To use it with your store, you’ll need a second tool called WooCommerce Multilingual:

First of all, install the WPML plugin. You don’t have to configure it for now, since you’ll still need to integrate it with WooCommerce so that it also supports product translation.
After that, install the WooCommerce Multilingual plugin. Once both tools are set up, you can check out this top-to-bottom guide to translating your online store. We’re not going to lie – it will be a time-consuming process – but the rewards are well worth it.
Conclusion
Getting more eyes on your online store isn’t always easy, but there are ways to do it. Adding new languages and currencies to WooCommerce, for example, has the potential to open up new demographics for you to market your products to.
Let’s review two of the most straightforward ways to implement these features in your WooCommerce store:
- Display your prices in multiple currencies using WooCommerce Currency Switcher.
- Set up additional languages using WPML andWooCommerce Multilingual.
Now that we’ve opened up new borders for your WooCommerce store, it’s time to talk about how to make sure it’s running in top shape. In the next chapter, we’re going to discuss why you should optimize your store’s performance and how to do it!
Optimizing Your WooCommerce Store’s Performance
Your ecommerce store’s performance will do a lot to determine its success. If its pages take too long to load, your customers could become frustrated and look elsewhere to make their purchases. That’s obviously something you want to avoid at all costs.
The good news is that the main culprits of performance issues are rather well-known. This means you can tackle the problem methodically, and work through each potential issue until you find one or more solutions that reduce your loading times.
In this chapter, we’re going to talk more about why it’s important for your store to load quickly, and explain what can get in the way. Then we’ll guide you through three simple methods for improving your WooCommerce store’s performance. Let’s get to work!
Why It’s Important to Optimize Your Store (And What Might Be Slowing It Down)
Having your store pages take a few seconds to load may not sound like a major problem, but it can actually be a deal breaker. Long loading times are associated with high bounce rates, and they can negatively impact your conversions.
The good news is that the usual culprits behind these slowdowns are well known. They often include:
- Poor site optimization: If you don’t make sure your site is running in top shape, it can slow down over time.
- Bloated plugins: Some plugins are not as well built or optimized as others, which means they can slow down your site.
- Using the wrong hosting plan: If you’ve outgrown your plan, your site’s performance will likely suffer.
- A slow web host: Not all web hosts are made equal, and some are simply faster than others.
For the time being, we’re going to assume your web host isn’t the problem, since that often means you’ll need to switch to a new host. Instead, we’re going to teach you how to take a hands-on approach to optimizing your store.
3 Simple Ways to Optimize Your WooCommerce Store’s Performance
There are plenty of ways to improve your store’s performance manually, but these three methods should provide you with a nice boost right away.
1. Optimize Your Images
One of the most important aspects of any online store is its product images. The quality of your photographs can directly affect your conversions, so you want yours to be as professional as possible.
The problem is that high-quality shots tend to take up more space, which can slow down your site. Fortunately, you can fix that issue by compressing them. There are plenty of tools that enable you to optimize the size of your images while barely affecting their quality, such as Compress JPEG & PNG Images:

Installing and activating this tool works just the same as with any other plugin, and once you’re done it will enable you to automate the optimization process for any image you upload. If you’d rather do the job manually, you can always use the web version of the same plugin, which lets you optimize up to 20 pictures at a time.
2. Replace Your Slow Plugins or Extensions
Not all plugins and extensions are made equal, and some can slow down your store due to poor optimization. Think about it this way – each plugin you add provides new functionality for your site, but in some cases they do this in an inefficient way that slows everything down.
Fixing this issue is relatively straightforward, but it can take some time. All you have to do is back up your store, then start going through your list of plugins one by one and deactivating them:
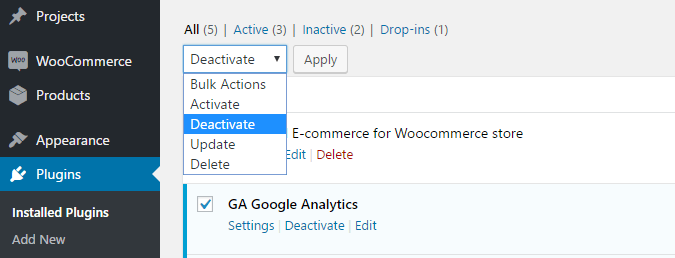
After disabling each plugin, test your site’s loading times to see if there are any improvements. If speeds remain the same – or the improvement is minimal – reactivate that plugin and try the next one instead. Keep in mind that there are likely to be some small variations during each performance test, so we recommend conducting a few and averaging the results for a more complete picture.
3. Try Using a Content Delivery Network (CDN)
Two of the most important factors behind poor performance are server distance and load. If your servers are overloaded or too far away from your visitors’ locations, your site can load slowly. A Content Delivery Network (CDN) tackles this issue by distributing cached copies of your site to nearby locations from data centers around the world, thereby lightening the load on your main servers.
As for which CDN to use, we’re big fans of CloudFlare thanks to its excellent free tier:

Plus, integrating WordPress with CloudFlare is remarkably easy. You can also consider an alternative such as Jetpack’s Photon, which enables you to cache your store’s images. It’s not as powerful as a full CDN, but it’s easy to set up and can improve your store’s performance drastically.
Conclusion
If your WooCommerce store is taking longer than usual to load, don’t worry – it’s something that happens to a lot of websites. Fortunately, there are plenty of ways to speed things up. You can work on optimizing your store’s setup, and if that doesn’t work you can always consider a new hosting plan or a different provider.
Let’s recap three of the simplest ways to increase your store’s performance:
- Optimize your images.
- Replace your slow plugins or extensions.
- Try using a CDN.
Now that your site is back in top shape, it’s time to start thinking about ways to expand your WooCommerce store’s potential. To that end, we’re going to talk about some of the coolest integrations you can add to the platform in the next chapter!
How to Integrate Third-Party Ecommerce Platforms With WooCommerce
WooCommerce is a powerful platform on its own, but you can also integrate it with other ecommerce services to gain even more functionality. The question is, which platforms are worth integrating with WooCommerce, and how can they help improve your online store?
Not every integration is a good fit for all ecommerce stores, so you need to think about what your audience needs and how you can help improve their experience. Often, the best move is to take a page from the most successful ecommerce platforms, such as Amazon, eBay, and Shopify.
In this article, we’ll talk about what ecommerce integrations are and how they can help you. Then we’ll introduce you to three useful integrations with the major ecommerce platforms mentioned above, and show you how to get started with each. Let’s get to work!
What WooCommerce Integrations Are (And How They Can Benefit Your Store)
In this context, integration simply means adding some or all of one platform’s functionality to another. For example, including Shopify’s Buy Now button in your WooCommerce store is a way of integrating the two platforms.
This is crucial because these kinds of combinations can be a major boon to your store. For example:
- Listing your WooCommerce products automatically on a third platform can get more eyes on them, which should lead to more sales.
- Adding checkout options that WooCommerce doesn’t support out of the box can get you more conversions.
These types of integrations are common for ecommerce stores, since no one platform has it all. That’s why we’re going to provide you with a little guidance on how to pull them off.
How to Integrate WooCommerce with Third-Party Ecommerce Platforms (In 3 Ways)
There are many types of WooCommerce integrations, but we want to focus on three of the simplest and most useful. These methods will help you take advantage of features from some of the biggest players in ecommerce, so consider giving them each a shot.
1. List Your WooCommerce Products on eBay
Displaying your products on your online store is great, but having them listed on multiple websites is even better. If one of those sites happens to be eBay, it’s fantastic.
Of course, anyone can list their products manually on both websites, so the key behind this integration is to do so as efficiently as possible. We recommend using the WP-Lister Lite for eBay plugin:

This tool enables you to take your WooCommerce products, adapt them to the eBay format, and publish dozens of them with just a few clicks. Plus, it can enable you to remove items from either website once they’ve been sold.
As usual, you’ll need to first install and activate the plugin. Then you’ll simply have to configure the plugin, and you can start listing your products on eBay.
2. Publish Your WooCommerce Products on Amazon
This integration works much the same as the one we just covered. The only difference is that in this case, you’ll be working with Amazon instead of eBay.
To pull this integration off, you’ll need to use the WP-Lister Lite for Amazon plugin:
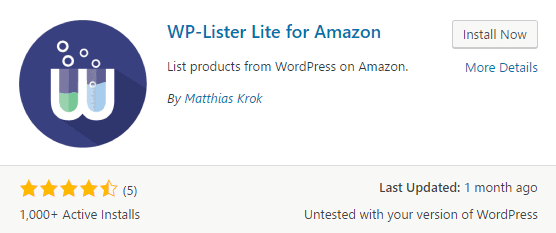
One of the biggest advantages of listing your products on Amazon is that you can use its Fulfillment by Amazon (FBA) program, which handles shipping for you. WP-Lister Lite for Amazon supports that feature, but keep in mind that if you use it, you’ll need to direct any purchases made on your WooCommerce store to your Amazon listings. To get started, you’ll want to check out an online guide to configuring both platforms to work together.
Shopify’s Buy Now button enables you to add products from that platform to your WooCommerce website. If you were previously using Shopify and still haven’t imported all your products from one store to the other, this can be a good stopgap measure:
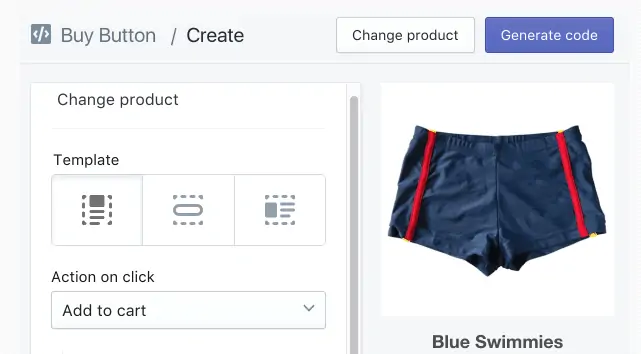
On the other hand, you can also use Shopify and WooCommerce together over the long term. For example, the former enables you to easily dropship your products, which can be a huge timesaver for items with a lot of turnover.
We’re big fans of WooCommerce, but that doesn’t mean that you shouldn’t consider taking advantage of some of Shopify’s better features. Plus, creating and adding a Buy Now button to your WooCommerce store is relatively simple.
Conclusion
Integrations are an excellent way to add features to your store that WooCommerce doesn’t include out of the box. Plus, these combinations enable you to link your store to some of the most popular online retailers.
Here are three suggestions to get you started if you want to expand your online store’s functionality:
- List your WooCommerce products on eBay, using the WP-Lister Lite for eBay plugin.
- Publish your WooCommerce products on Amazon, with the WP-Lister Lite for Amazon plugin.
- Add Shopify’s Buy Now button to WooCommerce to take advantage of both platforms’ features.
So far, we’ve covered both integrations and extensions. By now, your store should have all the features it needs to get off the ground. That means it’s time to talk about another subject that’s critical to its success – fraud prevention. In the next chapter, we’re going to teach you how to secure your store, and why that’s so important!
Fraud Prevention for Your WooCommerce Store
Online fraud is the ugly underbelly of ecommerce. Almost every store has to deal with it in one way or another, and some get hit hard enough to cause serious financial and even legal problems. Plus, the more you grow, the bigger a target you’ll become – so you can’t afford to ignore online security.
The good news is that you can be proactive about securing your site. Even if you can’t make online fraud go away entirely, you can minimize your store’s risks until they’re just another blimp on your radar. That way, you’ll be able to focus on improving your sales rather than dealing with scammers.
In this chapter, we’re going to talk about the real impact of online fraud on ecommerce sites, and go over three ways you can protect your WooCommerce store. Let’s crack this case open!
The Impact of Online Fraud on Ecommerce Stores
When it comes to fraud, the biggest threat you have to watch out for is chargebacks. After all, most people pay online using their credit cards, either directly or through a payment processor such as PayPal. If a credit card is stolen, its owner can usually reverse unintended payments. However, some people also do this on purpose to avoid paying for their purchases.
Either way, in these scenarios you’re the one who ultimately has to absorb the cost. This is such a common occurrence that it has a substantial impact on the entire industry. Let’s take a look at some stats, just to give you an idea of the scale we’re talking about:
- Ecommerce fraud rose 33% in 2016.
- Fraud cost online stores approximately $6.7 billion in 2016 alone.
- There was a 200% increase in credit card fraud only during the first quarter of 2017.
- 40% of customers who attempt a chargeback will do so again within a two-month period.
Ecommerce fraud is a serious threat, especially if you’re a new store with small profit margins. That’s why it pays to be proactive. Next up, we’ll teach you how to do just that.
3 Ways to Protect Your WooCommerce Store from Online Fraud
Let’s kick things off by noting that there are many methods you can use to secure your ecommerce store. However, these three are easy to implement and efficient, which makes them perfect for new stores.
1. Enforce the Use of Hypertext Transfer Protocol (HTTPS)

HTTPS is a protocol that encrypts all the data your users send through your site. This includes usernames, passwords, contact information, and payment details. Almost all the information ecommerce sites store is sensitive, so it’s important to keep everything safe.
Most online retailers these days use HTTPS, and implementing it is easier than ever. You’ll simply need to obtain a Secure Sockets Layer (SSL) certificate, which you can do for free using a service such as Let’s Encrypt:

Once you have a certificate, you can ask your web hosting provider to help you enforce the use of HTTPS on your WooCommerce store. Alternately, you can do it yourself if you’re comfortable with that approach.
2. Keep WooCommerce and Its Extensions Updated
Every website has a weak point, and in a many cases they can be traced back to software issues. The older a program is, the more likely it is to be vulnerable to attacks. This holds true for WooCommerce and its payment processor extensions.
WooCommerce version 2.3.10, for example, included a dangerous vulnerability that could be exploited to download sensitive files from websites. The team behind the platform dealt with this problem quickly. If you don’t stay on top of updates, however, you won’t receive crucial patches like this in time.
The good news is there’s a simple solution to this problem – keep an eye on your dashboard, and implement any pending WooCommerce and extension updates as soon as possible. It’s a small effort that can have a huge payoff.
3. Use a Fraud Protection Service

Last but not least, you also have the option of hiring a fraud protection service to monitor any purchases made on your site. Keep in mind that this is usually an expensive route, but it’s also an excellent way to weed out fraudulent transactions.
Most of these services work by analyzing all purchases, using their own algorithms that look for common red flags. If a transaction appears sketchy, the service will try to verify if the purchase is legitimate before letting it through.
This method may be overkill for some new sites. If you’re regularly getting hit by fraud, however, this is a solid option. Fortunately, there are plenty of excellent services that can help you out.
Conclusion
Every WooCommerce store needs to be mindful of ecommerce fraud. It’s not pretty, but it comes with the territory when you start selling products online. On the plus side, there are plenty of methods to protect your store from fraudsters, and implementing even a few of them will put you ahead of the pack.
Here are three simple ways you can take action to prevent fraud on your ecommerce site:
- Enforce the use of HTTPS.
- Keep WooCommerce and your extensions updated.
- Use a fraud protection service.
At this stage, you should have a secure WooCommerce store, but you may not have made your first sale yet. In the next chapter, we’ll help you fix that by introducing you to multiple ways to market your store without breaking your budget. Let’s get right to it!
Top Ways to Market Your Online Store (Without Breaking the Bank)
Even the best-looking WooCommerce store can still struggle to attract clients. There are so many online outlets for almost every niche that if you want your site to succeed, you’ll need to get the word out.
The good news is that you don’t need to spend a fortune to get more people to see your products. There are plenty of ways to market your ecommerce store on a budget, and once the sales start rolling in, you can scale up those same methods for even better results. For example, you can use social media sites like Instagram to market your products without spending a cent.
In this chapter, we’re going to walk you through four simple ways to market your store without breaking the bank. Let’s get started!

Well over two billion people now use at least one form of social media. This means that if you can tap into one of the popular platforms, you can reach a massive audience of potential new customers.
You can always pay for ads on your platform of choice, but we’re partial to more budget-friendly (and automated) marketing methods. Here is a simple guide to promoting your WooCommerce store using social media:
- Set up accounts on all the platforms that are relevant to your store and its audience.
- Find a tool to automate sharing your content to social media, such as IFTTT.
- Make use of popular hashtags in your niche, and reply to comments to increase engagement.
If you want to be as efficient as possible, it’s also smart to focus your efforts on the largest social media platforms, such as Instagram and Facebook.
2. Reach Out to Influencers in Your Niche

Influencers are social media users or accounts with lots of followers and very high engagement. Getting a mention or endorsement from one of these figures can net you a lot of sales.
Negotiating with influencers is often cheaper than other forms of advertising. In some cases, you may even be able to barter with them. Let’s go over a few steps to help you get the negotiations off the ground:
- Identify influencers in your niche.
- Contact them to see if they’re willing to advertise your products.
- Negotiate a rate or service exchange.
- Agree on the message you want them to publish.
Keep in mind that reaching out to accounts in your specific niche is a crucial part of this process. After all, their followers are more likely to be interested in products like yours.
3. Improve Your Store’s Search Engine Optimization

Search Engine Optimization (SEO) is the process of optimizing your store to get better results on platforms such as Google. It takes work, but it’s also one of the best ways to secure long-term traffic for your store. Plus, you don’t need to spend any money to improve your SEO effectively
There are plenty of plugins that can help you with your WooCommerce store’s SEO. Also, keep these tips in mind for optimal results:
- Choose adequate keywords for your products.
- Write thorough descriptions for each item.
- Optimize your product image’s alt and title tags.
These measures make it easier for search engines to find your products and rank them more highly. You probably won’t see results right away, but SEO work pays off over the long term.
4. Use Pay-Per-Click Advertising
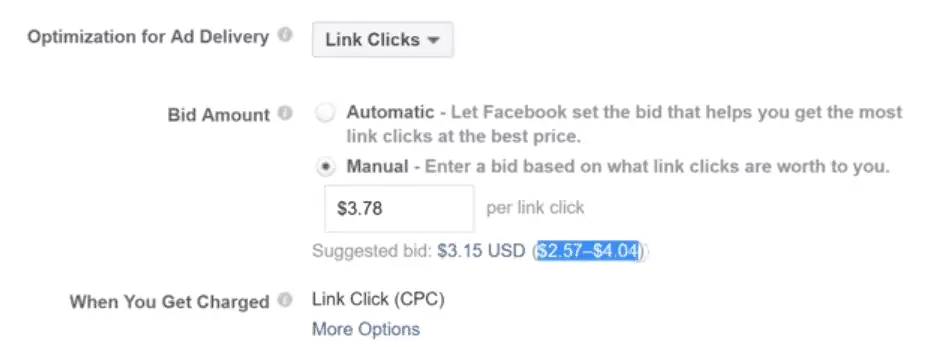
Pay-Per-Click Advertising (PPC) is when you run ads on a particular platform, and pay for each click on those ads. It’s a great way to target users who are already interested in your products or niche. Plus, you get to set your own budget, and in most cases each click should only cost you a few cents.
To be fair, PPC advertising isn’t a simple field to master, and you may not see results without investing some time and money. Nevertheless, here are a few steps to get the process started:
- Pick a platform to advertise on.
- Set a budget, and spread it out between ads to maximize how much data you get.
- Test variations of your ads to see which ones perform better.
- Scale up your top-performing campaigns.
If you’re on a very tight budget, we recommend waiting to implement this method until your products have a healthy profit margin. You’ll need a little money to play with to make PPC work for you – but the results can be impressive.
Conclusion
Turning your WooCommerce store into a success story takes time. To get there, you’ll need to grow your audience bit by bit, and coax each lead into becoming a repeat customer. However, the rewards of this investment are well worth it. Plus, once your store becomes more popular you’ll have a larger marketing budget to work with.
Let’s recap four of the most efficient ways to market your WooCommerce store on a budget:
- Use social media to get the word out.
- Reach out to influencers in your niche.
- Improve your store’s SEO.
- Use PPC advertisements.
All that’s left to talk about now is what happens once your store starts making enough money that you can work on it full time. At that point, you can always outsource some or all of your management duties, so you can focus on growth and development. That’s the topic we’re going to explore last!
Outsourcing Your WooCommerce Store’s Management
By now your store should be up and running, and you might have even made a few sales. Although it’s still early in your WooCommerce’s store life, you’ll want to start thinking about the future. More specifically, what happens when your store grows to the point where managing it becomes a full-time job?
The good news is that there’s no reason you can’t outsource your management tasks. Sure, finding the right help can be challenging, but the potential benefits are plenty. Chief among them is that you’ll get to enjoy more free time.
In this last chapter, we’re going to talk about the pros and cons of outsourcing your store’s management. Then we’ll guide you through the process of finding the right candidates and getting the ball rolling. Let’s begin!
The Pros and Cons of Outsourcing Your WooCommerce Store’s Performance
By now, you should be aware of all the small tasks that running an ecommerce store entails. These include updating products, handling shipments, taking photographs, replying to emails, and more. It’s a lot of work, and it adds up quickly. That’s why training someone else to do it can be a smart idea, if your budget allows.
As with anything else in life, outsourcing your store’s management has its pros and cons. Let’s start with the benefits:
- It frees up time for you to spend on other things.
- You can focus on the big-picture decisions rather than micromanagement.
- You’ll be able to outsource the tasks you don’t like or aren’t comfortable doing.
All in all, those are some compelling reasons. However, we should also mention the downsides of outsourcing so you can get the full picture:
- It’s not cheap.
- Finding the right candidate can be a difficult process.
- You’ll need to spend time training new hires.
Whether the pros outweigh the cons or vice versa will depend on your unique situation. If you do decide to outsource your management duties, read on to find out how!
How to Outsource Your WooCommerce Store’s Management (In 3 Steps)
If you think you’re ready to let someone else help you pilot your store, here are three steps to making it work.
Step #1: Look for the Right Candidate(s)
How many people you’ll hire to manage your store will depend on how much work there is. If you do bring more than one candidate on board, keep in mind that you’ll need to divide their duties accordingly.
Regardless of how many people you’re looking for, we recommend keeping an eye out for the following characteristics:
- Experience using WooCommerce, and possibly other ecommerce platforms.
- Excellent communication skills.
- Plenty of time to fit your work into their schedule.
The main thing you should look for at this stage is someone who won’t need you to hold their hand. After all, training someone with no experience usually takes too much time. In the past, we’ve had success on freelance sites such as Upwork, which is incredibly popular among remote workers:

Of course, there are other reliable platforms available, and you should be able to find suitable candidates on any of them if you take your time and offer decent rates.
Step #2: Outline Your Management Duties
What do you do every day to manage your WooCommerce store? This is a question you need to be able to answer and explain to your candidates. Moreover, you’ll have to break down your duties into specific tasks, so there’s no confusion about what your workers will need to do. The more detailed you get about this, the better, and you can even use the information as part of a contract to play it safe.
Let’s go over a few simple steps to creating a detailed work outline for your manager(s):
- Make a list of all the duties you want to outsource.
- Include full explanations for each task.
- Note how much time you expect each task to take.
- Mention any processes that require your approval.
Once you have all this information, save it as a document and use it during your hiring process. Professional freelancers will appreciate your attention to detail, and may be more drawn to your listing.
Step #3: Monitor Your Store’s Performance
Even after your new hire is settled in, your work isn’t done yet. You’re entrusting someone with a valuable project, so it makes sense that you’ll need to keep a close eye on them, at least at first.
If you feel that things aren’t going as well as they could be, you’ll need to provide feedback to your manager(s). After a while, if you don’t feel they’re a good fit, the smart move is to part ways and look for someone else.
Once you find the right match and can rely on their work, you’ll be able to simply monitor your store’s major metrics (such as your sales numbers and conversion rates). Aside from that, you’ll be free to focus your time on other projects!
Conclusion
Letting someone else take care of all the small tasks of managing your online store can be scary – especially given all the effort you’ve put into building it. However, outsourcing your management duties is a smart decision if you value your time and can afford it.
Let’s recap the three steps to outsourcing your WooCommerce store’s management:
- Look for the right candidate(s).
- Outline your management duties.
- Monitor your store’s performance.
If you’ve made it this far, you should be fully prepared to tackle the task of creating and growing a WooCommerce store. It can be a tough job, since you’ll have to juggle a lot of balls, but the rewards are well worth it.
Final Thoughts
We’ve covered a lot of information throughout this guide. By now, you should have all the basics you need to build and grow your WooCommerce store. You’ve learned how to add products, optimize and market your store, integrate it with various useful tools, and more.
Of course, with a field as complex as ecommerce, there will always be something new to learn down the line. Keep in mind that you can always refer to this guide at any time if you’re not sure what your store’s next move should be. We also encourage you to check out our library of ecommerce guides and news if you want to immerse yourself even more in the field.
Do you have any questions about how to set up your ecommerce site with WooCommerce? Ask away in the comments section below!

