Once you’ve chosen the right platform for your ecommerce operation, the next thing you need to consider is the design. Design is so important to the success or otherwise of your venture, beyond merely the aesthetics of the site. Pretty websites don’t always convert at the highest rate, and achieving any upwards tweak in your conversion rates can make a massive difference to your revenue (and ultimately your bottom line).
At the same time, that doesn’t mean you should be focusing solely on conversion rates, at the expense of a credible, professional looking design. Your conversion rate will seriously suffer if your website looks untrustworthy, or anything less than legitimate and credible. Simply things make a big difference here, so it really is worth finding a good freelance designer and pushing for a more attractive, conversion-focused layout.
Templates
Of course, there are also hundreds of thousands of ecommerce templates out there, many of which have been designed specifically for integration with various free or paid ecommerce software platforms. These templates are usually professionally designed and ready to go from the box, either free or paid versions, with designs revolving around various different niches and layout options.
Don’t be put off using a template, even for a larger scale store. OK, so the design won’t be unique, but you’ll still be able to put your own logo and branding stamp across it, and the reality is you’ll get to benefit from a solid, professional design and the higher conversions that can bring.
Themes
If you are using WordPress (or WordPress / WooCommerce), Magento or Shopify, you have access to a wide range of pre-designed themes, which can install a new skin across your website. From the colouring through to button, font and heading styles, these themes allow you to complete change the layout and design of every page on your site in just a couple of clicks.
Themes can be free or paid, and are often designed around specific colours or themes. With a bit of searching, you can find a highly professional theme design that can transform the look of your website.
There are plenty of places you can go to grab free and premium themes for different platforms.

https://wordpress.org/themes/
http://wwww.themeforest.net/category/wordpress
http://www.elegantthemes.com

http://www.woothemes.com/product-category/themes/woocommerce/
http://themeforest.net/category/wordpress/ecommerce/woocommerce
http://evowpthemes.net/10-of-the-best-wordpress-woocommerce-themes/

http://themeforest.net/category/ecommerce/magento
http://www.templatemonster.com/magento-themes.php
http://www.rockettheme.com/magento/themes

https://themes.shopify.com/
http://themeforest.net/category/ecommerce/shopify
http://www.shopifythemes.net/
Chapter 2: Shop Layout and Setup
Once you’ve thought more about the platform best suited to your online store, it’s time to dig deeper into the layout, setup and structure of your site. Setting out your online store in the most effective way is like designing the layout of a physical retail store – essential for ensuring customers see the products you want them to buy in a revenue-optimised flow through your website.
Regardless of the ecommerce software you chose from Chapter 1, there are certain fundamentals of structure and layout that have stood the test of time in maximising revenue and securing the best results from the online store.
Store Layout
Whenever there’s an issue of website layout in ecommerce, there are two, sometimes conflicting, objectives: conversion, and aesthetic. A website that converts isn’t always a website that looks the most visually appealing, and a website that looks the most attractive won’t always close more sales.
When deciding on the optimum layout for your store, there are several factors you need to bear in mind.
Don’t Confuse or Distract
As an overarching aim, your store layout can’t be confusing. Confusing the customer will harm conversions, because visitors will feel less comfortable in ordering, and less able to find the products they’re looking to buy.
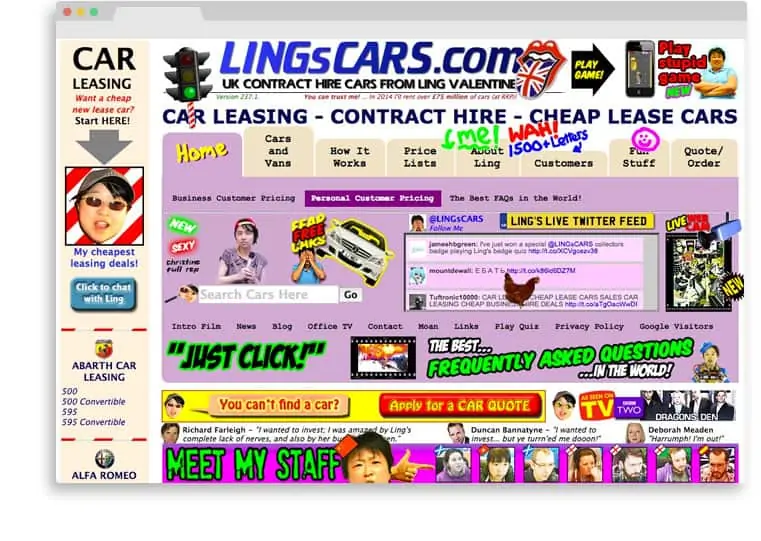
Watch out for cluttered pages, like www.lingscars.com (so bad it’s almost good).
As seen on BBC’s Dragons’ Den, LingsCars.com is perhaps the best example in existence of how not to layout your web store. This confusing, scattergun design isn’t conversion friendly, and while it might work for Ling, not everyone can pull it off.
Product information is difficult to find, and the screenshots above are surrounded by drawings, doodles, games and other ‘fun’ things. You can even ‘annoy Guy’, one of Ling’s staff, in the office by playing The Proclaimers on loop in the office at the click of a button.
There is an undoubted charm about Ling’s website, and by all accounts her business performs well. However, from a conventional store layout point of view, it’s nigh-on impossible to find the products you are looking for (in her case, lease cars) without making contact, or first getting distracted by Ling’s latest game or office webcam.
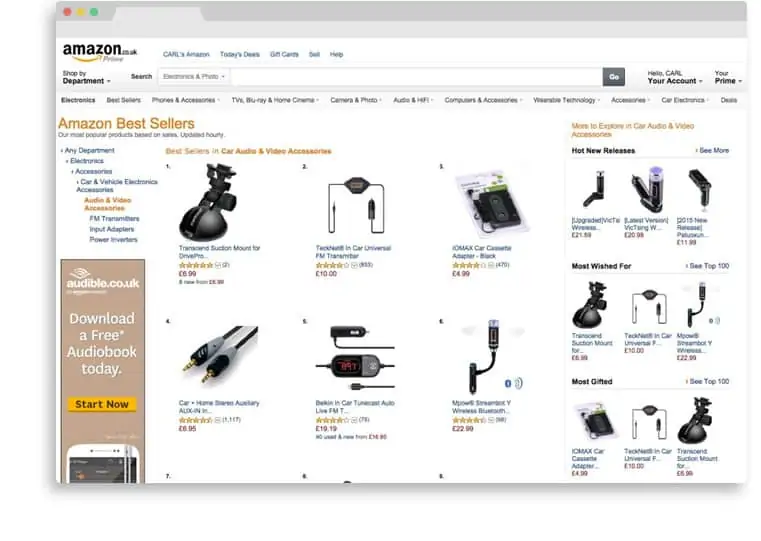
Contrast this with the layout of one undoubtedly the web’s leading ecommerce platform, Amazon. When it comes to finding what you need to find, it’s clear that the Amazon site is much easier to understand, and doesn’t confuse or distract the visitor from the main goal – channelling them to the products they want to buy, and squeezing them through the checkout process as quickly and conveniently as possible.
Don’t confuse or distract your visitors with unconventional layouts and unnecessary details. Keep your store layout clean, clutter free and focused, so your customers can find the information they need and the products they want to buy. The easier you make the process for your customers, the more likely they will be to buy from you.
Text / Visuals Balance
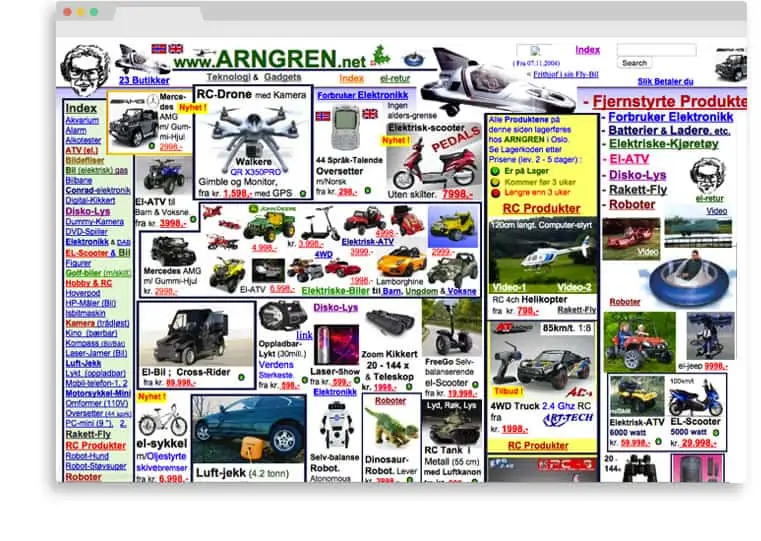
Getting the balance right between text and visual information is another important element of store layout. Essentially, buyers need to see an image of what they’re buying, but also clearly ascertain enough product information to know they’re making the right choice up front. Don’t force people to go searching for details, but present the information in a nice, clean digestible way. Some websites (like arngren.net pictured above) are too stressful to look at and use, and this will undoubtedly reflect in their conversion rates.
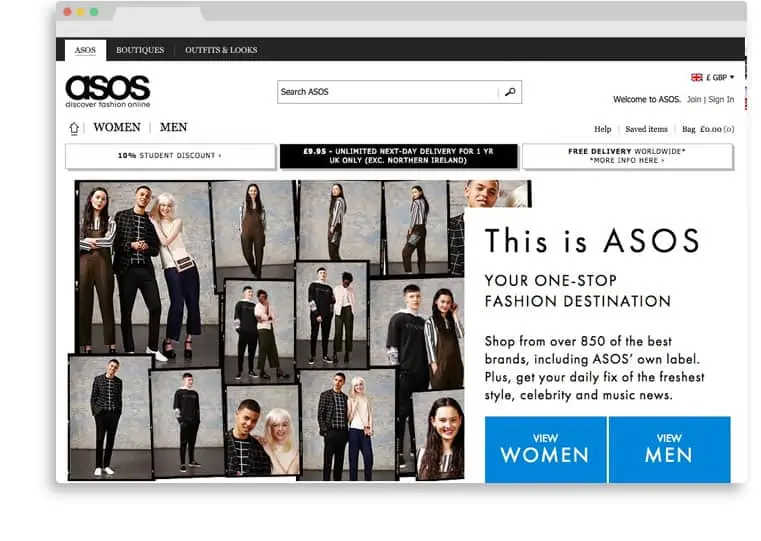
Contrast this with the clean, balanced visual-to-text ratio design of Asos, one of the web’s larger clothing ecommerce sites. The screenshot below shows the first window, above the fold (i.e. without scrolling) view of the Asos website. Look how much cleaner the design, and how easy it is to find what you’re looking for (Mens’ or Womens’ clothing) based on the correct balance of text and visuals on the page.
The takeaway point here is that you need to be focused in your layout design, building around the key ideas of simplicity, clarity and minimal choice. If you want your users to take one action decision, (e.g. clicking to view Mens’ or Womens’ categories), don’t confuse them with a million other decisions and potential actions they can take (and certainly don’t offer them the chance to play a game, instead of buy from your site, Ling-style).
When it comes to the hierarchy of your site, virtually all ecommerce stores have both category pages and product pages. Category pages list a range of products grouped by type, and product pages present the specific information for each individual product. With both of these types of pages, there are some further factors you need to think about in terms of how best to set out your stall. Let’s drill down further.
Category Pages
Say you run an ecommerce store selling musical instruments. Keeping your layout focused means that it’s unlikely you would want to present drum kits and guitar strings on the same page, along with bass guitar amplifiers and cellos. They just don’t mix as product types, and would usually be ordered fairly logically into independent categories – Drums, Guitar Accessories, Amplifiers and String Instruments, most probably.
When a visitor arrives at your online music store looking to buy a new acoustic guitar, they would most logically click on the Guitars category page, and drill down further from there to find the specific product page of the item they want to buy. How you order and structure your category pages can have a major influence on whether customers are able to find what they need to find, and whether they eventually click through to buy from your website.
Keep Everything Easy and Logical
Don’t design your website for a genius to navigate. In theory, a child should be able to navigate and make the right purchase from your site, and this means category pages that flow easily through to the correct end destination. Choose the most basic categorisations you can – if your customers are left guessing, or wondering which option is best to click, that’s the split second that could lead them away from your site and into the hands of your competition. Everything needs to be as easy and logical as possible, so that when visitors start navigating through your structure and your category pages more specifically, it all makes sense and takes them where they need to go.
Analysis Paralysis
At the same time, your groupings have to be broad enough to present a limited array of options from a significantly larger list of products. Studies show that the more choices you have, the more visitors you will attract to your website.

However, expect a fewer percentage to convert in to customers, thanks to the phenomenon of ‘analysis paralysis’. People get easily confused and flustered when confronted with a huge array of choice, and often decide to skim over the page, or to come back at a later date to make the decision. A few options are good – too many are too much hassle, at which point you’ve lost the sale.
Horizontal vs. Vertical Alignment
Appreciating variety is difficult, and you don’t want analysis paralysis to set in and dissuade your otherwise card-ready customers. When you do come to show variety within your category pages, you have the choice of presenting vertically or horizontally. So which is best for encouraging conversions and limiting a feeling of overwhelming choice?
Group horizontally, and introduce variation across the vertical axis. This allows your visitors to appreciate the choice on offer, without making them feel as if they’ve been presented with too much information to make a reasoned choice.
Everyone who does ecommerce well groups horizontally, and even supermarkets prefer this layout in presenting choice. That’s usually a good indicator that there might be something in it.
Product Pages
The crux of the conversion arguably lies most importantly on the product page itself, where buyers will either decide to proceed to your checkout (or add to cart), or to leave the product page and go elsewhere. ‘Elsewhere’ might be hitting the back button to head off in an alternative direction through your categories. Or it might be on to the next seller. Don’t take the chance – by making your product pages as effective as possible, you increase the odds of delivering better conversions, turning more of your visitors into happy customers.
Retail is Detail
They say ‘retail is detail’, and that is never truer than in the online environment. Tiny details give buyers the knowledge and confidence they need to make the purchase from your site, and small, simple mistakes on your product pages can have a serious impact on the effectiveness of your website. Don’t leak conversions by overlooking pertinent details, either in your descriptions or in the layout of your product page. By being precise in every detail, every image, and every text placement, you’ll can better fine-tune what your visitors experience when they come to buy from your online store.
Information To Buy From
When you are writing product descriptions it’s ok to be ‘salesy’, but by far your primary aim should be to write informative descriptions people feel confident to buy from. All the product specifics need to be included, and it’s a good idea to avoid long-winded paragraphs that don’t immediately shout the information you need to be heard.
At the same time you need quality product images, so the buyer can all but touch the product. Don’t skimp on product images, and the higher resolution images you can use, the better. These show off what you have available in their best light, so you are on track to seal the deal.
Here’s a run down of everything your product pages need to close visitors on the sale.
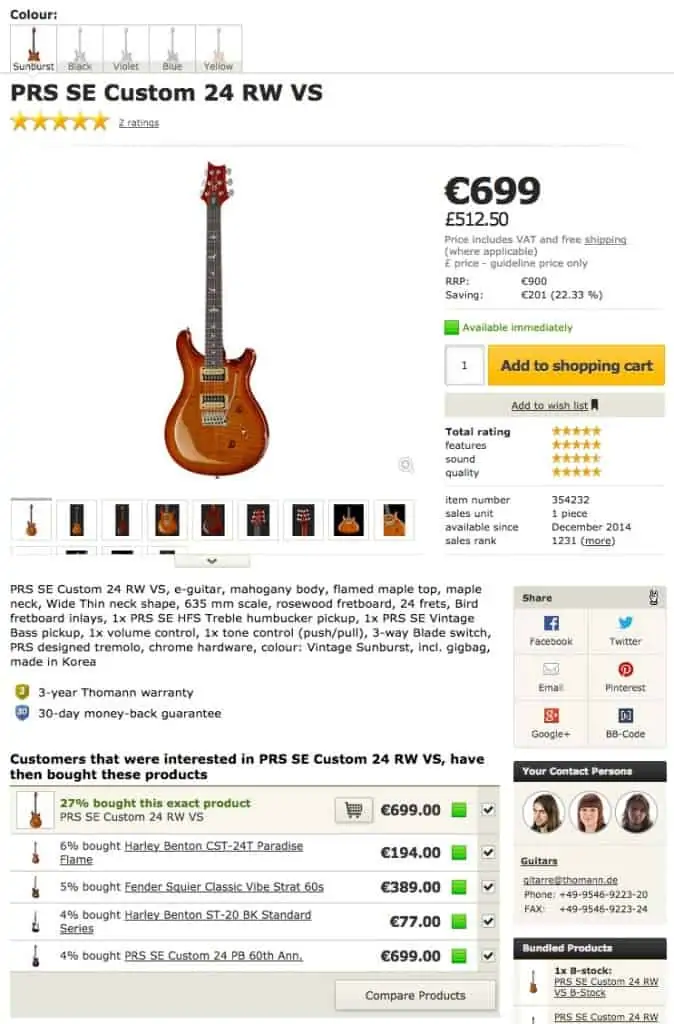
- Detailed Descriptions: Informative descriptions sell products. Include everything your customer could want to know about the product, including specifics about the model or variation you are offering. Some ecommerce sites summarise key details at the start of their description (and so above the fold), ensuring all visitors to a product page are shown the key features that indicate they’re buying the right product for their needs.
- Prominent Shipping and Returns: One of the most common reasons for buyer’s flight is unclear shipping information. People want to know how much it’s going to cost to get their products delivered, and whether they can send it back to you if they aren’t happy. Clarify these policies prominently on our product pages, and put your customer’s mind at ease so they feel comfortable to go ahead and complete the sale.
- Quality Photography: Amazon sets out several high quality, high resolution images on every product page, so buyers can see in sufficient detail the product they are looking at. When it comes to buying something, actually touching and feeling the product is often the best convincer. In the absence of touch, high resolution, well-lit photographs from a variety of angles can help convince the buyer they are making the right choice.
- Call To Action: Never underestimate the power of calls to action within your product description. Calls to action ask for the sale, and tell the customer to complete the purchase right now. Crafting a strong call to action will increase the conversion rate of your product page, and placing it above the fold and ideally in close proximity to the Buy button will boost your odds still further.
- Video Demonstrations: Where you can, video demonstrations of products are even better than images, and the perfect accompaniment to photographs in helping show the product off. Again, go for well-lit demonstrations if you are recording your own, or consider encouraging customers to submit their own video demonstrations and reviews for the products they own.
- User Reviews: Reviews are absolutely essential for any ecommerce product page, because people need to feel confident in the purchasing choice they are about to make. The opinions of others are extremely influential, and beneficial when you want someone to make a decision – the words of others are often more convincing than the words of your own, so let your other customers close the sale for you.
- Strong Buy Button: The desired action must be visible and stand out on the page. Make it as easy as possible to buy your products, and leave the visitor in no doubt as to what they need to do next.
- Social Share Buttons: Absolutely essential, social sharing buttons for Facebook, Twitter, Google+, and Pinterest if applicable. Social networks are a vital source of traffic for your product pages – why wouldn’t you want to encourage customers to share cool products and promote your pages to their fans, followers and friends online? Look around large ecommerce sites if you want to get a flavour for how major players do this.
Note: When you’re adding social share buttons, you need to take care not to distract from the selling process. Buttons that are too big, or that lead the customers away from your website to their Facebook login screen can interrupt the sale process – while it’s worth making waves on social, you shouldn’t interrupt the sale, or worse drag your customer away to someone else’s site at the point of purchase.
URL Structure
Both category and product pages need to be linked from the homepage if they are to be discovered by visitors to your site. Ecommerce sites can often turn out to be extensive, with countless individual pages to discover. Your URL structure is one way in which visitors can navigate around your website if they need to, while providing crucial SEO benefits in telling Google how it should interpret and rank your site.
When structuring your URL links, it is worth thinking about including categories and page names, so visitors can see “breadcrumbs” of the page’s location within your site. Breadcrumbs show visitors the journey they have taken to get from the home page to the page they are looking at. By structuring your URLs category1/category2/product-name, you get a breadcrumbing effect which is helpful for allowing visitors (and Google) to understand how your site is catalogued and how they might navigate around it.
Avoid placing products in two or more categories. Stick to one category per product, to avoid creating duplicate content on your website – content that will harm you on the SEO front more than it will help you on the sales front.
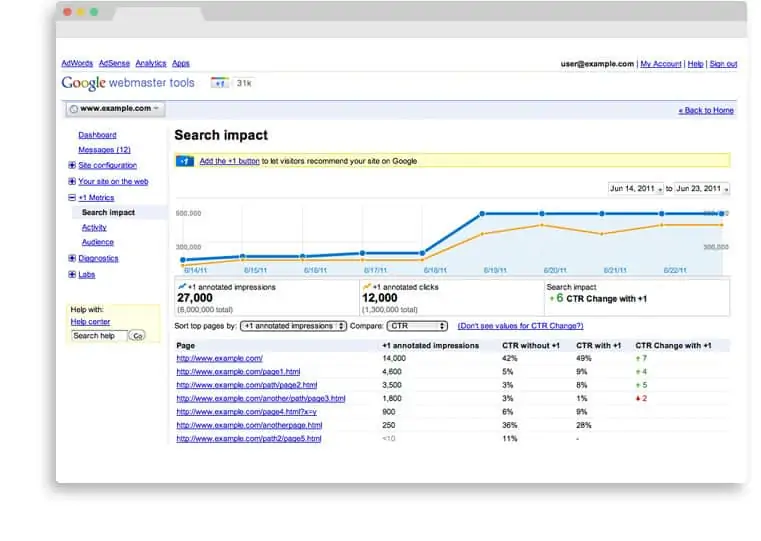
Google Webmaster Tools
Once you’ve finalised the layout and structure of your URLs, product pages and category pages, all that’s left on-site is to make sure you are ready for Google. Google Webmaster Tools is one way you can help fine-tune your website, and establish exactly what Google thinks about your site. Google Webmaster Tools allows you to:
- Submit sitemaps, so Google can identify every page on your site and index them accordingly.
- Check keyword statistics
- Identify ranking problems Google has spotted
- Optimise and tweak your site for visitors and Google alike
Webmaster Tools is completely free, and can provide invaluable information about the tweaks your website needs to perform better – whether that’s for Google directly, or by extension for those that come to visit and hopefully buy from your website.
You can create an account for Webmaster Tools and find out more information at: http://www.google.com/webmasters/tools.
Further Reading/Resources:
- http://www.shopify.co.uk/blog/14116937-3-ecommerce-design-mistakes-to-avoid-according-to-science
- http://www.slideshare.net/dear123000/good-bad-e-commerce-websites-2969089
- http://moz.com/community/q/best-url-structure-for-ecommerce-store-2
- https://www.siteground.com/tutorials/webmastertools/introduction.htm
